A Scratch & Win Valentine

2/10/15

valentine's day is only a few days away, and if you are still looking for a unique and inexpensive gift for someone, how about this. today i am re-sharing a diy project that will teach you how to create customized scratch & win valentine cards for your sweetheart!

What you will need:
  • one piece of card stock
  • access to a colour printer
  • packing tape (or thick roll of clear tape)
  • scissors
  • metallic paint
  • dishwashing liquid
  • small paint brush 


first start out by designing your card template. next you need to add "Win A Date" or copy the of your choice, and "Scratch Me" in one or more areas. here is where you should have fun with your design, colours and wording choices to make it as unique and personal as you like. find a white clip art, or vector image of a heart (or go ahead and create your own), and place in your layout. add a small text box inside the heart where your secret message will appear. copy your entire design and paste it three times horizontally to create three side-by-side images on your page. next go back to your text boxes and type in each heart what your receiver will win.

sample secret winnings can include things like,
  • beer & board games night,
  • pho & a movie, or
  • a winter picnic.
once you are happy with your design, print it out.

now, take your packing tape and place one full strip horizontally across your design covering all three hearts. be sure to watch out for any wrinkles when laying down the strip. the packing tape now acts as a protective shield over your hidden message so they won't get damaged when painted over or when scratched. now cut away any excess tape that reaches past your page edges. next mix equal parts metallic paint (or the paint colour of your choice) to dishwashing liquid, and mix well. in thin layers, using a small paint brush, coat the area over each heart creating an outline and then filling it in. the thinner the layer the faster it will dry between coats helping to speed up this process. the object here is to layer enough coats until your message becomes hidden by opaque colour. once you are happy with your coating place your painted design in a cool dry place for a few hours (or even overnight). once it has fully dried, take your scissors and evenly slice your paper vertically into three equal strips, creating your three scratch and win cards! you can now place them in an envelope, or hand them directly to your valentine. 

I actually made these for my husband this year, so now i just have to keep him away from reading my blog until the weekend so I don't kill the surprise! I'm very much looking forward giving him these over a quiet romantic evening in front of the fireplace at home with our favourite wine and a fantastic chocolate fondue! :)

Happy Valentine's Day

2/14/14


i love this day because the focus really is on acts of kindness towards others.
let's celebrate by making someone else feel great!
tonight, i am so looking forward to spending the evening with my fantastic hubby.
he's the best a lady could ask for, really, and i don't tell him that nearly enough.
so, fireside, blankets, a chocolate fondue 
and some good tunes,
that is where you'll find us.
xoxox

Dip-Dyed Valentine

1/29/14


what you need to get started:
  • white card stock
  • scissors
  • glass bowl
  • red food colouring
  • pen/pencil/stamps for love note writing
  • paper towel and/or plate as a drying station


with christmas behind us, little signs of love are popping up in hearts all over the city. even with the current polar vortex chill we are experiencing, it's hard not to feel warm and fuzzy about this upcoming valentine day of love. whether you spend it with a significant other, family or close friends it's a time to celebrate with random acts of kindness and hidden surprises for those around us. this simple DIP-DYED valentine project will help you with just that. inspired by the ladies at Merrythought, this project only takes a small amount of time to get organized and complete!

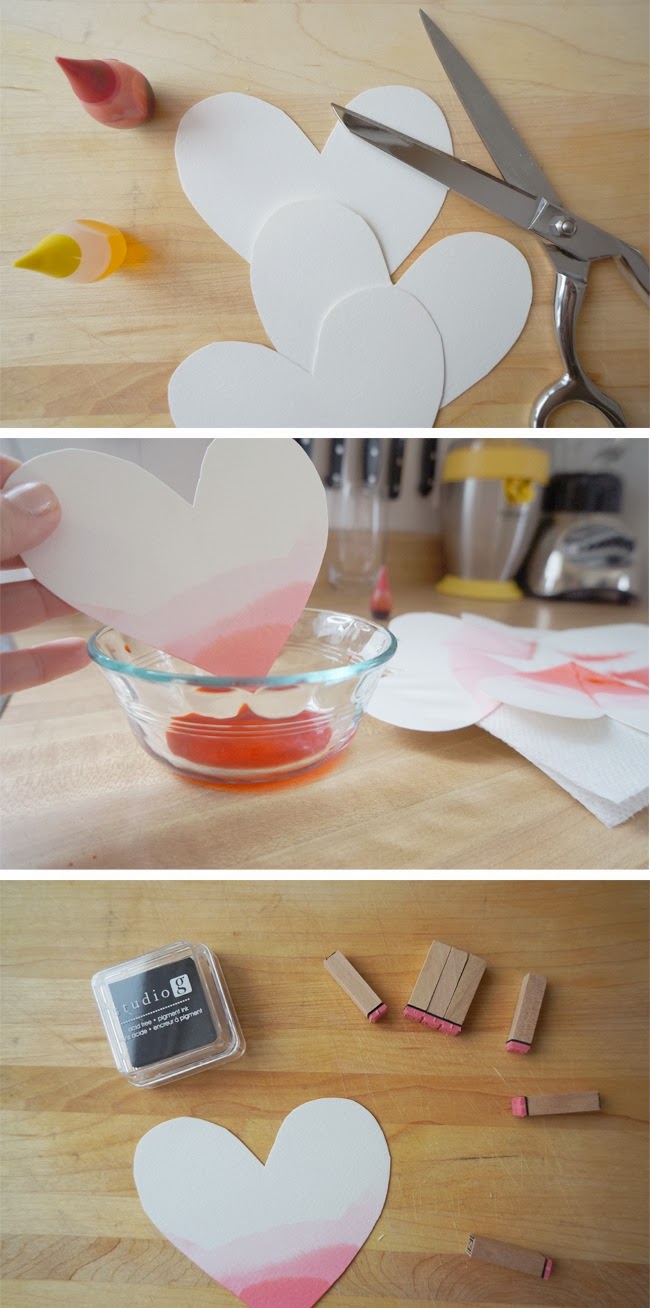
start by grabbing all the supplies you need and find a clean work space. next cut your card stock into heart shapes (you can even try varying the sizes!). next place 4 drops of food colouring into your glass bowl with a 1/3 cup of water. take one of your hearts and slowly dip it into the food colouring and water mix. the trick is to bring it out slowly so it stops dripping and still holds colour, and set it on a plate or paper towel nearby. continue this process with all other paper hearts you have. next add 4 more drops of food colouring to your bowl in order to create a deeper looking colour. once your hearts are dry to the touch take them one at a time and again dip them into this richer mix, slightly lower than your first noticeable line. continue this process of adding drops and dipping until you achieve your desired look. once all of hearts have dried to the touch you can then write your sweet nothings! 

these little love notes are perfect for hiding in an unsuspecting lunch box,  pillow, or hung around the house!


How to make someone happy.

2/8/13

How to make someone happy. Choose any one of the follow items above for guaranteed smile on Valentines day. For as much as some people like to moan and complain that this day is just for girls or is all about consumer greed, I propose thinking of it as a day to remind myself to appreciate others. It's not about the gifts or anything to do with money, it about doing something nice for someone else. It's generous acts of kindness that on a day-to-day basis we forget because we are all overly busy. Let it be a day to put yourself and your actions in check. Any of the ideas listed above are more thought than the price tag. Make someone breakfast in bed before they get up, take the time to paint or design a homemade postcard for a friend. Create hearts out of felt and put in a fun coupon or fortune for kids, or dip cherries in chocolate and enjoy them with a friend. For the extra adventurous reader,  mix and match all the items you see. Or even just do a random act of kindness for someone in need. Voila! Watch smiles grow and make your guts feel good on the inside. 

xoxox.

Valentines : Mini Heart Pies

2/8/12

Who doesn't love a homemade pie. 
This valentine's try and whip-up these little mini pies to share with loved ones! 
These small delights are also a perfect size for stashing away as a little afternoon treat into a lunch box. Not only do they look totally cute, but you can also change out the jam for other filling items like Nutella. I don't know what it is, but some food just seems so much more entertaining and mouth-watering when it comes in an itsy-bitsy, teenie-weenie, one-bite size.


Photo credit: www.crosbiecrew.blogspot.com, yankiemagazine.com, marthastewart.com

Yield: 5-6 mini cute pies

You will need the following:

  • 1 package refrigerated pie crust (or homemade pie crust dough)

  • heart pocket press or heart shaped cookie cutter

  • yummy raspberry (or any red) jam
, or even something like Nutella
  • 1/4 cup melted butter
  • 1/4 cup of milk for edging

  • 1/4 cup coarse sugar

  • pastry brush

  • parchment paper
-baking sheet

Preheat the oven to 400 degrees and line a baking sheet with parchment.
Roll out the dough and cut an even number of circles using a cookie cutter or a large glass (around 3 inches across). Re-roll scraps if necessary.

Using a heart cookie cutter or a butter knife, cut out the hearts.
Arrange half of the dough circles onto the baking sheet, then place a tablespoon of jam into the center of each.

Using your finger, lightly wet the edges of the circle with milk (or cream), then top with another dough heart, lightly pressing to seal.
Curl up the edges to help create a seal, then press down with the tines of a fork to crimp closed. This will keep the filling from leaking out. 


Photo credit: www.crosbiecrew.blogspot.com

Using a pastry brush, brush the tops of the hearts with a small amount of melted butter - you can also use the butter to help stick a decorate additional pie crust heart onto!

Brush the hearts with a tiny bit more butter, then generously sprinkle with coarse sanding sugar.

Poke a few holes around the heart with a toothpick to let the steam out while they are baking.
Bake for 15-20 minutes or until golden brown then transfer to a wire rack to cool.

NOTE: You can also make little pie cups by using items like small muffin tins or other fun shapes which can be filled with things like ice cream after. Just look for different ways to have fun with it.

OOMPHLOVE All rights reserved © Blog Milk Powered by Blogger