A Scratch & Win Valentine

2/10/15

valentine's day is only a few days away, and if you are still looking for a unique and inexpensive gift for someone, how about this. today i am re-sharing a diy project that will teach you how to create customized scratch & win valentine cards for your sweetheart!

What you will need:
  • one piece of card stock
  • access to a colour printer
  • packing tape (or thick roll of clear tape)
  • scissors
  • metallic paint
  • dishwashing liquid
  • small paint brush 


first start out by designing your card template. next you need to add "Win A Date" or copy the of your choice, and "Scratch Me" in one or more areas. here is where you should have fun with your design, colours and wording choices to make it as unique and personal as you like. find a white clip art, or vector image of a heart (or go ahead and create your own), and place in your layout. add a small text box inside the heart where your secret message will appear. copy your entire design and paste it three times horizontally to create three side-by-side images on your page. next go back to your text boxes and type in each heart what your receiver will win.

sample secret winnings can include things like,
  • beer & board games night,
  • pho & a movie, or
  • a winter picnic.
once you are happy with your design, print it out.

now, take your packing tape and place one full strip horizontally across your design covering all three hearts. be sure to watch out for any wrinkles when laying down the strip. the packing tape now acts as a protective shield over your hidden message so they won't get damaged when painted over or when scratched. now cut away any excess tape that reaches past your page edges. next mix equal parts metallic paint (or the paint colour of your choice) to dishwashing liquid, and mix well. in thin layers, using a small paint brush, coat the area over each heart creating an outline and then filling it in. the thinner the layer the faster it will dry between coats helping to speed up this process. the object here is to layer enough coats until your message becomes hidden by opaque colour. once you are happy with your coating place your painted design in a cool dry place for a few hours (or even overnight). once it has fully dried, take your scissors and evenly slice your paper vertically into three equal strips, creating your three scratch and win cards! you can now place them in an envelope, or hand them directly to your valentine. 

I actually made these for my husband this year, so now i just have to keep him away from reading my blog until the weekend so I don't kill the surprise! I'm very much looking forward giving him these over a quiet romantic evening in front of the fireplace at home with our favourite wine and a fantastic chocolate fondue! :)

DIY - Industrial Accents

10/15/14

this post topic may not be a newbie, but it's a goodie for sure.
after being in our house for over a year, we decided it was high time best to start hanging up some permanent fixtures, like ... curtains. 


we both love the fancy restoration hardware look, but definitely can't afford the prices at this stage in our life. so, we figured we would diy something we felt was just as good. welcome, our industrial pipe curtain rod! simple, fast and affordable. beat that fancy stores!

if you want to try this yourself, here is what you'll need and the how too:

1. buy a piece galvanized pipe (be SURE to clean it or you'll get back oil on your hands and curtains - i learned that the hard way) in your desired length and two toggle bolts to help support the weight of the piping curtain rod
2.  you'll also need to buy the flat piece which affixes to the wall, called an iron floor flange, and the macaroni looking piece, formally called the galvanized elbow, to connect your pipe to the flange 
3. once you have washed and cleaned (and if desired, spray painted), you are now ready to start the assembly
4. start by putting your curtains on your galvanized pipe facing the correct way 
5. next holding screw all the pieces of your pipe curtain rod together
6. now hold up the assembled curtain rod (you may need an assistant) and mark your drill holes on the wall 
6. put everything down and insert your toggle bolts 
7. pick-up your piping with curtains already on, line it all up and drill, baby drill (just make sure your curtain is already arranged facing the correct direction ... we also learned that one the hard way)

creating your own curtain rod out of galvanized piping allows you the flexibility to customize your rod for any sizing you need, and allows you the ability to turn corners for a corner windows. if the industrial look isn't your thing, you can easily spray paint the whole thing before assembling it in any desired colour.

helpful hints: 

  • at your local hardware store, ask if they can cut and thread the end of the galvanized pipe in the exact length that you need. This will be safer and you'll ensure it's the extract length required. 
  • also, unless your using shower curtain hooks, once this puppy goes up, those curtains ain't easily coming down - at all. so if you like to do more than steam clean your curtains  it's something to think about before screwing it all in and having an "oh-crap" moment.


#Authentic -- DIY

9/2/14

image via

no better way to start the day than feeling fresh out of the shower.
so for an energizing start to your day, try adding fresh eucalyptus. just take the bunch and tie them with twine and wrap and tie around your shower head. when the heat shower water and steam mix with the leaves, it activates their natural oils and creates a refreshing smell. 

this is also great for if you feel stuffed up from a cold and want to wake up those nasal passages! simple. easy and green.


#AuthenticLiving – Natural Summer Toner

8/26/14

image via

the summer season is the one time of year that can sometimes play havoc on my oily sensitive skin, so having a good toner on hand can be very helpful in my experience. because of my recent healthier natural living overhaul, i'm more particular now that much of what i put on my skin should be from natural sources. in fact, i believe that some of the best items can be made a home like this simple skin toner.

All natural Skin Toner & Cleanser
  • 1/4 cup witch hazel
  • 2 tbsp apple cider vinegar
  • 5 drops of essential oil (i like using a spearmint, lavender or lemon in the summer)
mix all the ingredients together and store in a glass container in a cool dark space. for best use i recommend using it a few minutes after face washing. you can also consider storing the mixture in a small spray bottle in the fridge to mist on face throughout the day to help cool you down during the summer. 

*Helpful Hint - Apple Cider Vinegar offers great health benefits. i even take a Tsp a day in the morning to help with good digestion and improve my skin from the inside out!

Reno Report - How To Build A Stone Walkway

7/2/14


this past Canada Day long weekend we paid a little much needed attention to the outside of our house. as you can clearly see, our home is situated on a pretty steep slope, which can make walking down the side of our house very risky. because of that area being our access to the backyard, our grass actually doesn't even want to grow there anymore, so in most cases you just slide yourself down a little mud patch. not so fun when with a lawn mower or when balancing a tray of drinks, etc. being the home DIYer's that we are trying to be, we decided we would tackle building our own stone walkway to give us a much better walking path. after some research, reading and a car load of supplies from the always helpful, Home Depot, we finally managed to cross this project off our list and it has made a world of difference.


so, for anyone who is looking to add a little curb appeal, or function to your yard, here is our simple "how-to" for building your own stone walkway.

first start out by deciding on the stones you want to use. we were fortunate that we had been given some leftover concrete paver stones pieces from a project on another house, so we decided to take this opportunity to use those. once you have the stone pieces you wish to use, the next thing to do is to layout your pattern in the way in which you want it to appear when finished. as i mentioned the side walkway for us had little to no grass growing because of all the slipping and sliding, so we decided to arrange our stones 6 inches a part in the hopes of laying some grass seed between the stones and encourage some growth. fingers crossed!


once you have decided on your patten, you then need to mark the stone area. we used a flat edged shovel and cut around the perimeter of the stone creating a guided area to dig within. once you have your outline cut, dig out 6 inches of grass and earth to create an even hole. it is important to ensure you go at least 6 inches deep so that you can create a strong solid base for your stone path. next add a layer of landscape fabric cut to the size of your hole. this fabric is designed to help stop weed growth, encourage proper water drainage and to create a good non-slip base for your gravel fill to sit on. once your landscape fabric is in place, start adding in your gravel stones until you reach 3 inches thick. next add in 2 inches worth of screening (a very fine sand/stone) on top. using a level, or something with a straight edge, move the screening around in the hole to ensure a nice flat and level surface. be sure to consider how you want water to run away from you house and adjust any slightly curves or angles with your stone with that in mind.


once your think your screening is level, using a tamper, compress your sand mixture. this helps to ensure that all the sand and stones have started to settle into all the small cracks and grooves, making a nice even surface for your stone to sit on. once you have finished tamping, add your stone into the hole. if it doesn't sit flat and level to the ground, readjust by adding or moving the screening around. once you are happy with how the stone is sitting fill ing any surrounding cracks or holes with the earth you pulled out. make sure you pack it tightly enough to create a nice seal.


work your way stone by stone down your path until voila, your beautiful walkway is complete! as you can see from our yard we still have a lot on our "to-do" side of the house list, but at least we have one thing crossed off for now! this path now makes it much easier for us to carry working supplies for more projects, or food and drinks down for summer patio parties!

Creating the Perfect Picture

5/5/14

images via here, here, here, here, here and here.


so, i'm a bit of a commitment phobe ... especially when it comes to hanging art. 
if there is one thing i've learned it's always hang the things you love to look at most. no matter what else, if you follow this one thing, you'll never feel disappointed by your choices. while there is no REAL set rules on how you have go about showcasing art/photography on walls, successful designers often follow a few guidelines. at the core of it all it is about placing what you love in the right combination. however, if you are a sobby stress mess pile at the thought committing to putting holes in beautiful freshly painted walls and hanging up pictures, like i can be, then here are some helpful tips to consider that will give you that little bit of confidence.

// Height - the most common recommendation the professionals make is to hang art at eye level. if you are a shorty like me try and keep in mind the viewpoint of an average height person. 

// Grouping -  I love me some good groupings. this is where oftentimes we get a little stressed. since there is no real rules here, my best recommendations tend to be start with larger pieces and fill in with smaller. good groupings take proper planning before you hang. think of it as a one large art piece rather than individual items. this will help you focus on the end results and not get caught up in the process. grouping is a great way to give an modern look to your home. if you have a bunch of frames take out the display art inside and play around with placements by taping them up on your wall before you hang.

// Proportions - as a general rule of thumb you want to hang art that is proportionate to said area. for example it is not recommend that you hang over your sofa a canvas print that is significantly wider than what the sofa seats. on the flip side this rule does not apply when it comes to heights. there is a misconception that shorter sizes fit better in smaller spaces, when in actual fact taller prints can make your smaller space feel much larger.

Proportion…if you are hanging art above a piece of furniture it is generally advised to not use art that is wider than the furniture. A general rule of thumb is to aim for the artwork to be between 50-90% of the width of the furniture below. 75% is ideal, but anything in the suggested range is usually safe. If your ratio is less than 50% then the artwork is too small, if your ratio is larger than 90% the art is too big. Exception: If you are hanging art above a grouping of furniture that is close together you would use the total width of the furniture as your guideline.
· Height…a well known rule of thumb is to hang artwork at "eye level" however, this is often misleading as we all vary in height. A better guideline is to hang the art so that the center of the art is at eye level for an average person, generally 60-65" from the floor. Most often art is hung too high, so if in doubt…hang lower rather than higher. If you are hanging art above a sofa or a table you will usually want to have about 6-12" between the top of the furniture and the bottom of the art.

Read more at http://studio5.ksl.com/?nid=59&sid=14755543#wmGTjPlUXjhoogMK.99

Proportion…if you are hanging art above a piece of furniture it is generally advised to not use art that is wider than the furniture. A general rule of thumb is to aim for the artwork to be between 50-90% of the width of the furniture below. 75% is ideal, but anything in the suggested range is usually safe. If your ratio is less than 50% then the artwork is too small, if your ratio is larger than 90% the art is too big. Exception: If you are hanging art above a grouping of furniture that is close together you would use the total width of the furniture as your guideline.
· Height…a well known rule of thumb is to hang artwork at "eye level" however, this is often misleading as we all vary in height. A better guideline is to hang the art so that the center of the art is at eye level for an average person, generally 60-65" from the floor. Most often art is hung too high, so if in doubt…hang lower rather than higher. If you are hanging art above a sofa or a table you will usually want to have about 6-12" between the top of the furniture and the bottom of the art.
· Line….consider whether the space in question needs the illusion of horizontal expansion or vertical height, then choose your artwork accordingly. Diagonal lines are sometimes needed for spaces such as stairways. Areas that are irregular in shape and line are a great place for round artwork, mirrors or wreaths. Round shapes soften angular areas and help to avoid the problem of rectangular art looking crooked.
· Grouping… this can be tricky but can also have amazing visual impact. A group of pictures should be thought of as one cohesive "unit. An easy trick for creating a grouping is to trace each individual piece of art onto paper and then cut out the shapes. Using these paper shapes you can arrange them on the floor, or even directly onto the wall using some tape. This enables you to determine which arrangement you prefer without having to put dozens of extra nail holes in your wall. When you have found the desired configuration you can then lightly mark it onto your wall with a pencil.
· Tools for the job…my favorite hooks for hanging pictures are called "monkey Hooks" and they require no hammer or nail! These hooks are usually available at your local hardware store. If I am hanging art for a client I always make sure I have on hand a laser level, pencil, measuring tape, hammer, nails and picture hanging hooks for all different weights. If you have a picture that doesn't like to stay straight use some Sticky putty on the bottom corners. Adhesive felt pads are great to ha

Read more at http://studio5.ksl.com/?nid=59&sid=14755543#wmGTjPlUXjhoogMK.99
Proportion…if you are hanging art above a piece of furniture it is generally advised to not use art that is wider than the furniture. A general rule of thumb is to aim for the artwork to be between 50-90% of the width of the furniture below. 75% is ideal, but anything in the suggested range is usually safe. If your ratio is less than 50% then the artwork is too small, if your ratio is larger than 90% the art is too big. Exception: If you are hanging art above a grouping of furniture that is close together you would use the total width of the furniture as your guideline.
· Height…a well known rule of thumb is to hang artwork at "eye level" however, this is often misleading as we all vary in height. A better guideline is to hang the art so that the center of the art is at eye level for an average person, generally 60-65" from the floor. Most often art is hung too high, so if in doubt…hang lower rather than higher. If you are hanging art above a sofa or a table you will usually want to have about 6-12" between the top of the furniture and the bottom of the art.
· Line….consider whether the space in question needs the illusion of horizontal expansion or vertical height, then choose your artwork accordingly. Diagonal lines are sometimes needed for spaces such as stairways. Areas that are irregular in shape and line are a great place for round artwork, mirrors or wreaths. Round shapes soften angular areas and help to avoid the problem of rectangular art looking crooked.
· Grouping… this can be tricky but can also have amazing visual impact. A group of pictures should be thought of as one cohesive "unit. An easy trick for creating a grouping is to trace each individual piece of art onto paper and then cut out the shapes. Using these paper shapes you can arrange them on the floor, or even directly onto the wall using some tape. This enables you to determine which arrangement you prefer without having to put dozens of extra nail holes in your wall. When you have found the desired configuration you can then lightly mark it onto your wall with a pencil.
· Tools for the job…my favorite hooks for hanging pictures are called "monkey Hooks" and they require no hammer or nail! These hooks are usually available at your local hardware store. If I am hanging art for a client I always make sure I have on hand a laser level, pencil, measuring tape, hammer, nails and picture hanging hooks for all different weights. If you have a picture that doesn't like to stay straight use some Sticky putty on the bottom corners. Adhesive felt pads are great to ha

Read more at http://studio5.ksl.com/?nid=59&sid=14755543#wmGTjPlUXjhoogMK.99

Proportion…if you are hanging art above a piece of furniture it is generally advised to not use art that is wider than the furniture. A general rule of thumb is to aim for the artwork to be between 50-90% of the width of the furniture below. 75% is ideal, but anything in the suggested range is usually safe. If your ratio is less than 50% then the artwork is too small, if your ratio is larger than 90% the art is too big. Exception: If you are hanging art above a grouping of furniture that is close together you would use the total width of the furniture as your guideline.
· Height…a well known rule of thumb is to hang artwork at "eye level" however, this is often misleading as we all vary in height. A better guideline is to hang the art so that the center of the art is at eye level for an average person, generally 60-65" from the floor. Most often art is hung too high, so if in doubt…hang lower rather than higher. If you are hanging art above a sofa or a table you will usually want to have about 6-12" between the top of the furniture and the bottom of the art.
· Line….consider whether the space in question needs the illusion of horizontal expansion or vertical height, then choose your artwork accordingly. Diagonal lines are sometimes needed for spaces such as stairways. Areas that are irregular in shape and line are a great place for round artwork, mirrors or wreaths. Round shapes soften angular areas and help to avoid the problem of rectangular art looking crooked.
· Grouping… this can be tricky but can also have amazing visual impact. A group of pictures should be thought of as one cohesive "unit. An easy trick for creating a grouping is to trace each individual piece of art onto paper and then cut out the shapes. Using these paper shapes you can arrange them on the floor, or even directly onto the wall using some tape. This enables you to determine which arrangement you prefer without having to put dozens of extra nail holes in your wall. When you have found the desired configuration you can then lightly mark it onto your wall with a pencil.
· Tools for the job…my favorite hooks for hanging pictures are called "monkey Hooks" and they require no hammer or nail! These hooks are usually available at your local hardware store. If I am hanging art for a client I always make sure I have on hand a laser level, pencil, measuring tape, hammer, nails and picture hanging hooks for all different weights. If you have a picture that doesn't like to stay straight use some Sticky putty on the bottom corners. Adhesive felt pads are great to ha

Read more at http://studio5.ksl.com/?nid=59&sid=14755543#wmGTjPlUXjhoogMK.99

Proportion…if you are hanging art above a piece of furniture it is generally advised to not use art that is wider than the furniture. A general rule of thumb is to aim for the artwork to be between 50-90% of the width of the furniture below. 75% is ideal, but anything in the suggested range is usually safe. If your ratio is less than 50% then the artwork is too small, if your ratio is larger than 90% the art is too big. Exception: If you are hanging art above a grouping of furniture that is close together you would use the total width of the furniture as your guideline.
· Height…a well known rule of thumb is to hang artwork at "eye level" however, this is often misleading as we all vary in height. A better guideline is to hang the art so that the center of the art is at eye level for an average person, generally 60-65" from the floor. Most often art is hung too high, so if in doubt…hang lower rather than higher. If you are hanging art above a sofa or a table you will usually want to have about 6-12" between the top of the furniture and the bottom of the art.
· Line….consider whether the space in question needs the illusion of horizontal expansion or vertical height, then choose your artwork accordingly. Diagonal lines are sometimes needed for spaces such as stairways. Areas that are irregular in shape and line are a great place for round artwork, mirrors or wreaths. Round shapes soften angular areas and help to avoid the problem of rectangular art looking crooked.
· Grouping… this can be tricky but can also have amazing visual impact. A group of pictures should be thought of as one cohesive "unit. An easy trick for creating a grouping is to trace each individual piece of art onto paper and then cut out the shapes. Using these paper shapes you can arrange them on the floor, or even directly onto the wall using some tape. This enables you to determine which arrangement you prefer without having to put dozens of extra nail holes in your wall. When you have found the desired configuration you can then lightly mark it onto your wall with a pencil.
· Tools for the job…my favorite hooks for hanging pictures are called "monkey Hooks" and they require no hammer or nail! These hooks are usually available at your local hardware store. If I am hanging art for a client I always make sure I have on hand a laser level, pencil, measuring tape, hammer, nails and picture hanging hooks for all different weights. If you have a picture that doesn't like to stay straight use some Sticky putty on the bottom corners. Adhesive felt pads are great to ha

Read more at http://studio5.ksl.com/?nid=59&sid=14755543#wmGTjPlUXjhoogMK.99


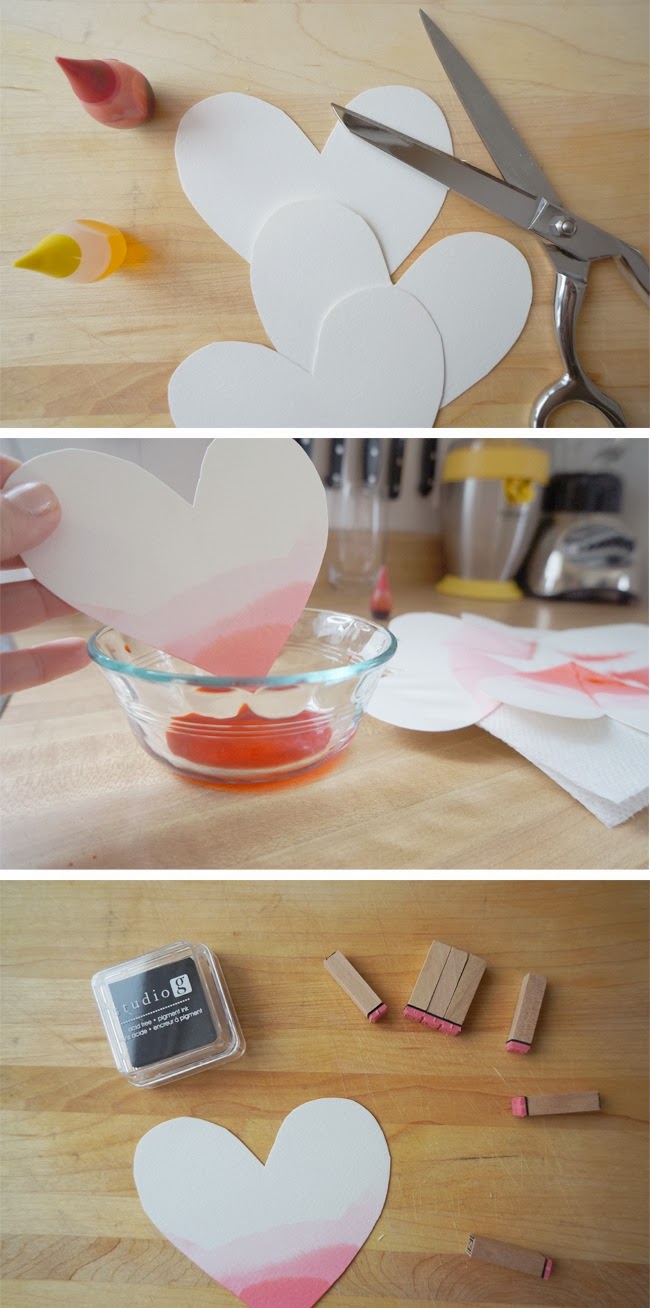
Dip-Dyed Valentine

1/29/14


what you need to get started:
  • white card stock
  • scissors
  • glass bowl
  • red food colouring
  • pen/pencil/stamps for love note writing
  • paper towel and/or plate as a drying station


with christmas behind us, little signs of love are popping up in hearts all over the city. even with the current polar vortex chill we are experiencing, it's hard not to feel warm and fuzzy about this upcoming valentine day of love. whether you spend it with a significant other, family or close friends it's a time to celebrate with random acts of kindness and hidden surprises for those around us. this simple DIP-DYED valentine project will help you with just that. inspired by the ladies at Merrythought, this project only takes a small amount of time to get organized and complete!

start by grabbing all the supplies you need and find a clean work space. next cut your card stock into heart shapes (you can even try varying the sizes!). next place 4 drops of food colouring into your glass bowl with a 1/3 cup of water. take one of your hearts and slowly dip it into the food colouring and water mix. the trick is to bring it out slowly so it stops dripping and still holds colour, and set it on a plate or paper towel nearby. continue this process with all other paper hearts you have. next add 4 more drops of food colouring to your bowl in order to create a deeper looking colour. once your hearts are dry to the touch take them one at a time and again dip them into this richer mix, slightly lower than your first noticeable line. continue this process of adding drops and dipping until you achieve your desired look. once all of hearts have dried to the touch you can then write your sweet nothings! 

these little love notes are perfect for hiding in an unsuspecting lunch box,  pillow, or hung around the house!


The Reno Report - White Kitchens

1/27/14


our kitchen before ... 


our inspiration board after weeks on pinterest ... 


images via
i love the use of white in a kitchen. it's so fresh and clean and bright. it's calming and it makes me feel really creative. as i'm getting older i find i really love to cook, so i like saving my bright colours for food and in my dishware. much like a few of the other rooms i have shared, we have a number of elements we have to work around until a bigger reno is possible. in the case of our kitchen we have faux wood looking countertops and some old cabinetry. so, most of what we are trying to do is a few updates to help make what we have look a bit more modern, i'll just call "phase 1", aka. the temporary facelift. for the past few months we've been chipping away at putting a little love and life back into this main hub of our house.

the update list we are tackling includes:
  • paint old wood cabinet handles white and add cabinet pulls
  • remove the blind over the sink and add curtains to the window
  • removed useless and extremely small small broom cabinet (that actually only fits a broom)
  • paint the yellow hoodfan
  • change old light fixtures 
  • hang some small fun art/images
  • change out old not working properly dishwasher 
  • maximize or increase storage space to the fullest potential
  • paint ceiling a nice bright white
we are almost done getting through this list and I just cannot wait to show you the results! i'm very excited with how much happier and brighter this kitchen feels. our life right now is all about budgets so learning what you can do with a little pocket money is so important, and I think i have some great ideas to share. 
 i would love to see your before and afters, link them in the comment! what does your dream kitchen look like?

Five Pin-tastic DIY Advent Calendars

11/27/13


let the official countdown to Christmas begin! this year why not try making your own advent calendar for something a little more creative. here are five unique ways that others are counting down down to the festive day (or week in my case!). each of these ideas  can easily be adapted every year. just fill each day with a little loving surprise like a chocolate, candy, a small toy, or a super sweet note.

1/ this DIY is made of toilet paper rolls, how brilliant is that!
3/ I love how easy each match box is to reuse and how magical it looks hung
4/ the pin me up presents, so easy and so economical to reuse the clothes pins
5/ this basket tree likely take up the most space, but would be so great for big families to share in one advent calendar

Four Pin-tastic Pumpkins

10/23/13

halloween is just around the corner. i don't even know where this month went! this is going to the first time i'm home for this holiday, so i'm dusting off my costume box, busting out some ears and getting ready to greet the new faces in our neighbourhood. in light of these upcoming festivities, i thought i would share a few pumpkin design ideas that are really getting me inspired for this holiday. now to choose which one i want to try.
via
 dab on some golf leaf to glam up your pumpkin by using a general glue adhesive. this design also be done with any basic gold paint either brushed on our dipped
via
add some scary accents like these vampire teeth from the dollar store costume isle. this little accent can go a long way for a scare factor 
via
the washi tape magic. this is likely the fastest and least dirty option. perhaps a good one for any last minute planners out there
via
 drilled pumpkins look even better when they are lit up against a house or porch at night. just create a simple repetitive pattern for an even stronger visual effect

Check Me Out ... Checkers

8/29/13

one of my favourite games growing up was checkers and i realized recently that i don't have any board games of my own. in fact as an adult old school board games aren't something that i seem to have acquired, but i'm starting to think it might be fun to have. one night while cooking i saw my old burnt trivet that I had been meaning to throw out and this idea popped into my head. here is a simple, quick and resourceful diy travel game which can be made in less than an hour.
if you live in Canada you know that the penny is no longer something we can use, so this DIY project also helps you find a little useful purpose for those pennies you might find laying around the house. old buttons work just as well too in case you surprisingly have no pennies.
1. grab up all the supplies you will need as listed above 2. if you don't have an old burnt trivet like me, then a piece of cardboard or even the inside of a cereal box will work. 3. take your tape and mark out a grid pattern  4. take your brush and black paint and fill in the holes on the grid with one or two coats and allow that to dry completely. 5. remove the tape and fill in the remaining square holes with your white paint to complete the look of the grid pattern. helpful hint - if you want a sharper looking grid, take a black pen or marker and outline each square for a cleaner looking style 6. once your paint has dried grab your pennies or button, partner, popcorn and beverage and play a few rounds. A super great way to recycle, reduce and reuse (insert cheesy music with that last statement.. haha!).


Pimp Ma Pencils

8/19/13

the sweet smell of fall is hitting the air and that immediately makes me crave back to school supplies and an ever fresh Starbucks Pumpkin Latte. sure i'm not in school anymore (and haven't been for a while), but that doesn't stop me. i love me some fresh new pencils and pens ... and clean white paper, and sketch pads, and erasers, and colourful pens – ok, you get the point. there is no reason why in the fall we can't still grab some new office supplies and reorganize our desk spaces.  here is a fun and fast DIY to jazz up your pencils and get yourself or your family ready for the next big project or school.
1. start by collecting all the necessary supplies: pencil(s), paint brush, paint and self-adhesive reinforcements or tape 2. place the reinforcement stickers in a random pattern on your pencil and ensure you press well so they stick  3. grab your brush and colour and paint in the centre of the circle. you will likely notice that it will take about three coats to create a nice opaque colour 4. once the colour has dried slowly peel back the reinforcements and clean off any excess adhesive from the sticker 5. sharpen that bad boy and enjoy!
helpful hint - if you want to paint stripes or lines lightly sand that section pencil first

7 Thrify Steps

10/5/12

Take a moment to assess your neighbourhoods and the stores you are interested 
in. More often than not, thrift stores collect from their community members, so learn 
about  the cultures that reside in those areas, and/or the style of products that those 
stores seem to carry on a regular basis. So, if you are looking for a specific item, this will 
help to narrow down your list of stores.
Good thrift shopping takes time. If you are looking for a quick trip or a specific item, 
then this line of shopping isn't for you. Make sure you have time on your side. Plan 
an afternoon, go with some friends, pack a snack and pick up a coffee or tea. If you 
take the time to do the proper digging, you will not be disappointed. Also keep in mind 
that if you don't love it, don't buy it! Chances are there will be more interesting items
 to come!
Make sure you know what it is you need. Shopping is never a good idea with out a list. Keep
 in mind what you are looking for and when you see something you like try to envision 
it (all cleaned up) in your home or space.
Sometimes we see things that we don't even realize could be stunning after a little 
tender loving care. When thrift shopping, try and see past the chips, scratches or mix-matched colours. Keep an open mind and envision what you think it could look like. 
Focus on what makes it is that makes it an interesting piece.  Ask yourself, if this was all one 
colour what would I notice first? Often times what you find in a thrift store needs a
 little personalization once you bring it home, but it is in doing so that you really create the statement pieces that you'll come to love the most.
 This might just be the most important golden rule - know the schedule. Keep a notepad and 
pen with you when you start figuring out the stores you like to shop in.  By asking the 
staff, make a note of  when they typically bring out new product (most times it is 
during the week on a Tuesday or Thursday), and if/when they have sales or special 
events. This will help you to source out the best products before they get picked over.
When you start spending enough time digging through stores, you can sometimes get 
lucky and come across some very chic brands. Pay attention to the labels because 
not only may it be something that you find you love, it may also be worth something.
The real trick to good thrift store finding is to go often. The items you see will change 
hands frequently, so it is best to go hunting on a regular basis keeping in mind what 
the items are that you need or want.   
Happy hunting!


OOMPHLOVE All rights reserved © Blog Milk Powered by Blogger