Savouring Summer this Season

11/3/15

image via here 
Fresh herbs are the true gem of summer recipes and part of what makes the season such a prize winner. Now that winter is on our heels it's time to shutdown those fading green gardens, and winterize up our homes. I fully admit that i shed a few tears whenever i have to see my edible garden come to an end, but many of the plants have already withered away, but the herb plants are still holding on by the skin of their leaves. So grab up those herbs and save them using any of these four suggestions to relish that sweet summer glory all winter long. 
 
images via here, here, here and here. Also, here and here 

1. Smaller pots inside - window sills are your best friends during the winter. Herbs love to grow on the sills or in areas of the home with lots of light. if you still have large herb plants still in your garden, divide and repot into small containers that can easily can be brought indoors. This will help sustain their growing cycle and in most cases you can even replanted them into the garden in the spring. say hello to new fresh indoor herb gardens with this one my friends.

2. Sweet sachets - nothing is better than the smell of fresh herbs like basil, rosemary. i find that they can be quite uplifting at the end of a long day actually. So why not harvest those end of season outdoor herbs, dry it in either a brown paper bag or by hanging, then crush up gently and place combinations into small sachets that can he placed around the home or in drawers. Combinations like rosemary and lavender are really good.


3. Herbed ice cubes - This is a culinary dream team is especially great for those busy nights when you wanna make that 5 star meal, but have like 1 start energy. Harvest the those last herbs, chop up and place them into ice cube trays. Then top with water or oil and freeze until needed. Add them as a quick boost to stir-frys, soups or dips. Try different herb mixes as well like basil with chopped garlic, or thyme and parsley with red pepper flakes.  


4. Scented fireside sticks - We are in the season of firing up the fireplaces. This year try take some of your harvested herbs and wrap into bunches with rope. On your next fireside movie night throw a one or two bunches on the roaring flames for a nice sweet smelling aroma. For this mix, try sage, rosemary and thyme!

Bean crazy about beans

2/4/15

image via


in the dead of winter there is nothing like a good hearty soup to warm the soul. soups are also great because you can make anything with literally almost nothing. right now one of my favourite recipes is a hearty bean soup made from my all time fav, the fava bean.  fava beans are an old school pea, that has a creamy texture and wonderful flavour. you can easily find these beans at your local grocery store in a can, or fresh in the pod, which means all you have to do is shell them.

aren't they the cutest?

image via

this week, give this hearty fava bean soup recipe a try and i'm sure you will be hooked.

adapted from Martha Stewart
  • 1 cup chopped onion 
  • 1 tablespoon olive oil 
  • dashes of salt and pepper 
  • 2  cup chicken stock or vegetable stock
  • 2 1/2 cups blanched, peeled fava beans 
  • 1/2 cup chopped broccoli
  • 1/4 cup grated Parmesan Lemon juice
  • 2 cloves garlic
  • 1 tsp turmeric
place all the ingredients in a pot, bring a boil and simmer on low for 20 mins. once the beans and broccoli are soft use an emulsion blender to puree until smooth.

Kale Pesto Margarita Pizza

11/6/14

both beautiful images via here

homemade pizza fridays have become somewhat of a tradition in my house. we look forward to it all week and often pair our tradition with a nice glass of vino! i personally really love pizza, and doing this has allowed us to play around with different combinations of seasonal toppings. here is one of our favourites that we can't get enough of right now. as you know, we participate in a CSA farm box, so once a week on Friday's we get tasty local produce delivered to our doorstep (nothing is better than groceries appearing for you!). This time of year we are seeing a lot of kale, so one of our favourite friday pizza's to make is our Kale Pesto Margarita!

The Dough:

  • 3 cups all purpose flour (or 2 3/4 cups of whole wheat flour)
  • 1 cup water
  • 1 tsp fine sea salt
  • 1 package of yeast 
combine your yeast and water in a small bowl and allow the yeast to activate and bubble for about 10 mins. while that is activating mix all your dry ingredients together in a big bowl. when the yeast is ready pour it into your dry mixture. now mix everything together with your hands and then roll it out onto a floured countertop. knead the dough until it comes out smooth and with a good elastic feel. when it's ready, place it in an oiled bowl and cover with a towel until it has doubled (about an hour). punch it down and let it rest for about 10 more minutes before it's ready to be rolled out and toppings applied. 

The Pesto Sauce Base:

  • 2 cups freshly washed and de-stemed kale
  • 1/2 cup walnuts or pine nuts
  • 2 cloves of garlic
  • 2-3 glugs of extra virgin olive oil

if you have a food chopper or food processor this is the perfect time to bust that out. pesto is really the easiest thing to make, just throw in all your ingredients and blend, baby, blend. if you feel it is a little too thick you can add a little extra olive oil. if you find you don't use all the pesto for the pizza, you can keep it in the fridge for up to two weeks in an air tight container. 

Toppings:

  • sliced tomatoes
  • thinly sliced mozzarella
  • fresh basil

preheat your oven to 400 degrees. roll out your dough onto a parchment lined baking sheet, or pizza stone (which i very highly recommend for a nice evenly cooked crust).  now cover your rolled out dough with a nice amount of pesto sauce base. next add your toppings, in this case tomato and mozzarella. Helpful Hint - I don't bake the basil on the pizza otherwise, i find it looses it's great fresh flavour and beautiful texture. bake your ready to go pizza for about 10-15 mins until the crust is nicely browned. take it out, drizzle with fresh olive oil – you can even add a little balsamic glaze – and top with some fresh basil leaves.

enjoy! xoxo.


Kitchen Basics Series - What Does That Mean?

10/24/14


illustration via here.

sometimes we can get tripped up or intimidated to try new recipes by all the lingo we see before us. here are some common terms to familiarize yourself with to help make any recipe you come across that much easier to understand.
chopped vs. diced vs. minced
  • chopped: cutting your vegetables into large pieces. typically you will see this for larger vegetables  like squash or potatoes.
  • diced: similar to chopping, dicing means cutting into smaller sized pieces. You likely will see this term used with ingredients like onions or celery.
  • minced: this means cutting the item into the smallest pieces you can. in the case of garlic, a garlic press minces perfectly.

blanching: cooking a vegetable very slightly and then immediately stopping the cooking process by rinsing under cold water. blanching is great if you are planning a big dinner party and you want to precook a vegetable dish to get a jump on your preparation. you can then quickly finish cooking just before serving to ensure the dish is nice and warm.

bouquet garni: this is a tied bunch of fresh herbs that is added to stews, or pots of simmering food for a little while and then taken out before serving.

dash: who has ever really measured a dash? well it turns out someone has and it is equivalent to about 1/16th of a teaspoon. this is a very small amount that is a little more than a pinch.

dust: this term appears often in baking recipes and it refers to lightly spreading a small about of a spice or sugar over the baked dish. most often this is part of a finishing step before serving.

julienne: this means to cut your vegetable or item into very thin slices, kinda like a very skinny french fry.

puree: to mash up or mix together your food until it's completely smooth, ideally in a food processor is easiest.

thin: if you see this term is means adding more liquid to thin out what you are cooking.

sauté: cooking your food in a frying pan with a little oil.

steep: you might often see this term if you are making a tea, or a simple syrup. it means to soak something (like tea leaves) in a liquid almost until boiling for a set amount of time until the flavours come out.

zest: pulling off small sections of the skin of a citrus fruit, in many cases a lemon, lime or orange. This is most often done with a fine grater called a zester so the pieces remain small.


The Pantry Fine Cheese

7/18/14

Located on the at the intersection of Gerrard and Coxwell in Toronto, you will find a new little shop that just opened it’s doors called THE PANTRY.

While this boutique store may appear tiny in size, we all know that good things come in small packages, and in terms of some of great Canadian artisan cheeses, this statement could not be more true in the case of this shop. Owner and operator Jeremy Lago is a Sommelier, now turned Fromager who has hit the nail on the head when it comes to filling Toronto’s needs for all things cheesy goodness.


Focused on solid relationships with local farmers, Jeremy has brought to Toronto a celebration of some of the best assortments of Ontario artisan cheeses that we should all feel extremely proud of. From the creamy Crossroads Sheep Gouda, to the handcrafted Five Brother’s cheese with traits of Gouda and Swiss; or an aged variation of an Oxford harvest cheese called Tipsy that has soaked for 6 days in a Merlot Cabernet. Last but not least, my personal favourite, The Aged Five Brothers, with its the creamy, mouthwatering, nutty and caramel like flavouring. Walking into the shop, there is no way your taste buds can even accurately anticipated what you will experience.

In fact, anything you find at The Pantry is nothing short of spectacular. The shop also specializes in offering locally sourced accompaniments (for exceptional pairings), and an olive and pate bar to help you put together a perfect afternoon or evening plate to enjoy alone or along with friends and family. Being a Sommelier too, it goes without saying that Jeremy is the best at making exceptional recommendations for wine and cheese unions.

It should also be mentioned that he even does cheese wheel wedding cakes. Yes, you read that correctly.

Last night I had the pleasure of attending The Pantry’s first wine and cheese pairing party hosted at The Lazy Daisy’s Café. Organized along with the fine folks from Fielding Estate Winery, a large group of us sat down to a well-informed lesson on the art of the paired tasting. Leading with explanations on textures, colours and tastings notes the group of us were in inseparable cheesy heaven.

I cannot say enough about not only buying local goods, but also the benefits on shopping from local small businesses – which The Pantry is quickly topping that list. There is not a chance you will leave this shop feeling unsatisfied. It is quickly becoming one of the hot new shops in the east end of town. 

Thank you Jeremy for celebrating some Canadian food talents and for teaching us the pleasure of fine food feasting. www.thepantryfinecheese.com.  

Shock Grandma & Make Mom Proud Vegan Mac & Cheese

6/10/14

i highly suggest you get your bookmark button ready or get up right now and grab a pen and paper.  


thanks to the creative minds behind The Minimalist Baker, this is likely the best healthy Mac & Cheese you can whip up on a weeknight or weekend. it is literally mouthwatering and believe it or not, it's made with eggplant. i swear if you have kids they might not even be able to tell! with my recent change to a healthier lifestyle i've been on the hunt for clever meals and comfort foods that have been, or easily can be adapted into much healthier options. this search lead me to the the fine folks behind The Minimalist Baker and their unreal, oh so good Vegan Mac & Cheese with Caramelized Onions. 

I made it ... I ate it ... I craved for seriously more bowls, it was that dang good. 

I highly suggest you check out the full recipes here with glorious pictures to boot.

Health Hint! for the next little while i am going gluten free, dairy and egg, so because of that i substituted the recipes bread crumbs for almond flour and used quinoa pasta (or you can also use rice pasta) rather than whole wheat. easy, fast and simple! 

Easy Bake Granola

5/28/14


since the new year i have been focusing hard on getting my health in check. not that anything was wrong with me to begin with, but more so that it just felt high time to spend a little more effort focusing on good health habits and routine for the future. after a few months into it i also started to see a naturopath recommended by a good friend, and i can't say enough about naturopaths in general now. while i still see a regular MD for lots of things, i like the time and one-on-one preventative health attention i get from my naturopath. seriously check one out if you can, because i cannot say enough about them. along with some great tips and suggestions from her, she's really taught me the value and positive health benefits of whole well-rounded meals, and more specifically just what that looks like. one of those meals is homemade granola and over time i've adapted what i like into this very yummy nutrient packed recipe below.


this recipe is great to make on a sunday morning or evening, ready then for the week.

You will need//
  • 1 tbsp organic honey (melted if in the solid form)
  • 1 cup almonds
  • 1 cup macadamian nuts
  • 1/2 cup steel cut oats (remove for a gluten free granola and replace with green lentils)
  • 1 tbsp coconut oil (melted)
  • 1/4 cup coconut flakes 
  • 1/2 cup pumpkin seeds
  • 1 tsp cardamom (you can add more for taste)
  • 1 tsp cinnamon
The how too//
preheat your oven to 350 degrees. throw all your dry ingredients excluding the spices and coconut flakes into a large bowl and mix well. next take your spices and sprinkle them over your dry ingredients and again mix well so everything is nicely covered. on the stove top slowly melt your honey and coconut oil. once they are melted drizzle it over your bowl of ingredients. mix all together and then spread your mixture out onto a baking sheet.  pop it into the oven and bake the mix for 30 mins, making sure to turn the mixture every 10 minutes or so just to make sure it doesn't burn. after 30 mins add your coconut flakes and then bake for another 10 minutes. take out, let cool and enjoy! i love to eat my granola in the mornings with a little almond milk and some fresh berries, or as late afternoon snack!

**homemade granola is best stored in a glass jar in the fridge**

Kitchen Basics Series – Fiddleheads

5/15/14


image from here and here
have you ever seen those little dark green vegetables that look very much like the top of a violin? well those tasty things are fiddleheads, which appear in the spring and are the funniest looking vegetable you can find (i think). they are actually little curled ends of a fern plant that when cooked are very delicious! they have a short growing season so you don't see them in stores or at farmer's markets for very long, if you blink you might miss it, but they are by far one of the easiest vegetables to cook and are a fantastic healthy addition to any meal. 
Basic Sautéed Fiddleheads
  1. 1/2 tbsp. butter
  2. pinch of kosher salt
  3. two handfuls of fiddleheads
  4. 2 chopped garlic cloves
  5. salt and Pepper to taste
  6. juice of half a lemon

The How: sauté your garlic in the melted butter then quickly add your fiddleheads. add your lemon and kosher salt. sauté them for about 8-10 minutes on a medium to low heat. now add your salt and pepper to taste. should you like, you can add a sprinkle of dried hot peppers or even some freshly ground parmesan before serving. 
A Cooking Helpful Hint!  it is recommended to not add salt to a pot of boiling water or a pan before placing your vegetable or food inside? if salt is added beforehand it can often settle to the bottom and create white little spots on your stainless steel pots and pans.

That Time I Took A Fondant Class

2/19/14

last week a close friend and i signed up for a fondant class at Sugartiers, just north of the city. so here is a little secret about me. i actually dislike cake. i know, i know. unless it's an ice cream cake, or that Betty Crocker confetti batter kind, you'll often find me gracefully declining a piece. I don't know what it is, but i've just never been a big cake eater. a classic sprinkle donut... now that's another story. regardless of my taste buds, i have always admired the art of cake decorating, especially after seeing the works of them, them and them.  i do enjoy baking and more so i love making beautiful treats for others to eat, so i saw this as an opportunity to expand my currently very small skill set. i also highly recommend taking a class with a close pal, who will laugh with you as you photograph your food repeatedly and cover yourself head to toe with flour. bella your my best baking pal!

so after a fast 3 hour session, here is my masterpiece. not the best i've ever seen (please disregard the tissue used to hold up the bow until it hardens), but i'm happy to say it isn't the worst i could have done! I definitely need a lot more practice and have a lot more to learn, but what surprised me the most was just how easy fondant is to work with. in fact, incredibly so. i'd even argue that if you wanted to really impress guests and you didn't feel overly confident, go with fondant. I wouldn't say you could master it perfectly in one go, but i think you would very much surprise yourself at how good you are, like we did!

here is the coles notes version for those of you who might want to give this a whirl. start by baking your cake of choice. once it has cooled, shave off any rough edges or bubbles on the top to make your working surface as nice as straight as possible. mix up a basic butter cream recipe (like this one) and apply a quick thin coating of buttercream all over the cake to create your crumb coat, which will hold your fondant in place. next make sure your work surface for fondant is super clean (no crumbs to get stuck). then take some icing sugar and dust your work surface. grab your premixed and coloured fondant (use a brand like Satin Ice) and gently roll it out making sure not to flip it over, or allow it to stick to your surface. because of the gum in fondant it will roll crazy easy so all you need to do is make sure it's big enough for your cake. next drape it over your cake and lightly pat it into place, watching out for finger or nail marks as you press, and cut off any excess. quickly using your your left over fondant before it dries, you can cut out shapes, or roll into braids, or molds etc and attach these decorations using small dabs of water.

now i'm jazzed to find a pipping class as our next challenge and i'm pretty certain it is going to knock us off our chairs!


Spiced Rum Cider

12/6/13


this is the perfect winter hot cocktail for those super blustery days. it is easy to make and something that you can also whip up sans booze, and in very large batches at very low costs (good for big gatherings). to me this hot cocktail always smells like the holiday season and creating it makes the whole house smell just perfect.

You will need:
  • a medium sized pot
  • 1 jug of apple cider
  • 1 ounce of black spiced rum
  • 1 apple
  • 1 orange
  • 8 cloves
  • 2 cinnamon sticks
  • allspice
The How To:
dump the entire jug of apple cider in the pot. peel your apple and drop the peel into the pot. take your naked apple and place your cloves into the flesh all over, then drop that as well into the pot. next cut your orange into slices and place all of it in, along with 2 cinnamon sticks and a dash of all spice. then let the mixture come to a good simmer for about 15-20 mins. strain the liquid to remove all the cooked fruit and spices. warm your mugs in hot water under the tap and then add 1 ounce of black spiced rum (for anyone who hasn't tried the Kraken, I highly recommend it!). finally, garnish your cup with a cinnamon stick, which doubles as a festive straw adding extra flavour!

**Helpful Hint - If you find you have left over spiced cider, store it in a glass jug or mason jar in the fridge. then at a later date you can remove and reheat to enjoy!

Hot Toddy to the Rescue

11/25/13

image via

this past week i was so sick, and I don't mean like the light sniffles sick. i mean brutally sick. two trips to the walk-in clinic and a wack of meds sick. it's been over a week that i have been off work with this very nasty flu, fever, congestion and bad cough. now that i am finally seeing the light at the end of this dark tunnel i am back to blogging. most times when i'm sick i really like to stay away from meds if i can avoid it. i strongly believe that the body should try and heal naturally with lots of healthy vitamin rich foods. when it comes to the common cold there is one thing that i find really does the trick - a warm hot toddy. Hot toddy recipes were traditionally drunk before going to bed, or in wet or cold weather. They are in many cases said to relieve the symptoms of your common cold and flu. Since yes, alcohol can dehydrate, i always follow up my hot toddy with two glasses of water (which also helps release any bad toxins in your body).

Here is my tried and true recipe 
  • 50 ml of Whiskey or Bourbon (i personally love Bourbon) 
  • 25 ml lemon juice and a wedge of lemon thrown in
  • 3 cloves
  • 1 stick of cinnamon
  • 2 tsp honey
In a mug add in your whiskey, lemon juice and honey. Then take your three cloves and push them into your lemon wedge and add to the mug. Top up with boiling water and garnish with a cinnamon stick. Give it all a good stir and serve immediately to drink while hot. Follow up with two glasses of water to rehydrate the body.

Spiced Pumpkin Cake

11/13/13

this week while cleaning out my pantry i noticed i had an extra can of ED Smith 100% pure pumpkin puree. I haven't made a single pumpkin cake before but decided why not give it a go, and actually, it was really good. so good in fact that I will definitely save this recipe to make again. when i was looking for a recipe to follow i noticed that they all had a basic standard mix of ingredients. so i took a list of those items and made a few modifications to suit what I already had handy at home. this pumpkin cake has such a lovely range of rich flavours that it's perfect for this time of year. it also makes a great dessert with a little added homemade cream cheese icing on top should you ever need a quick dinner party option. the next time I make this I think I might try substituting the cinnamon out for a dash of cardamom, just to mix it up.
what you will need:
  • 1 ¼ cups brown sugar
  • ½ cup cooking oil
  • 1 2/3 cups canned pumpkin
  • 2 eggs
  • 2 ½ cups all purpose flour
  • 3 tsp baking powder
  • ½ tsp each salt, ginger, & ground cloves
  • 1 ¼ tsp cinnamon
the how to:
preheat your oven to 350 F. then beat together 1 cup of your brown sugar with your oil, canned pumpkin & eggs. separately mix together your flour, baking powder, salt, ginger, cloves, and 1 tsp cinnamon (or other spices you choose). then take your wet pumpkin mixture and mix it with your  dry ingredients just enough to moisten all ingredients. spoon the mixture into a small greased cake pan. mix remaining ¼ cup brown sugar and ¼ tsp cinnamon and spread it over the top of the mixture before baking. bake for 1 hour or until toothpick comes out clean.

Winter Fresh Peaches

9/17/13

fresh peaches yummmmmmm. soon these fuzzy treasures will be out of season and cost literally an arm and a leg if you want one. this year i've very much been focused on eating locally, but now I want to include a task of eating seasonally. that isn't something I have been very good at because i often find myself getting sucked into the rows of shiny happy fruits at the grocery story during the cold winter months. I get so entranced by things like a genetically modified shiny strawberry bigger than my fist! but this year I am going to try to remain strong, armed with my seasonal fruit charts in hand. this past weekend as i was gallivanting around at the grocery store, i saw a whole display of overflowing baskets of fresh ripe peaches on sale and decided it high time I put my preserving/canning skills to work so we can enjoy seasonally fresh peaches this winter.
what you'll need:
  • fresh ripe peaches
  • heat proof containers. (i highly recommend buying yourself some mason jars because they will last a lifetime)
  • mason jar lids and rings (these are the only kind that will create a airtight seal for long-term storage)
  • vanilla beans or cinnamon sticks
  • large pot
  • sugar
  • ladle
  • baking sheet
  • tongs
basic sweet syrup:
mix 2 cups water to 1 cups sugar. bring to a rolling boil for 3 minutes stirring regularly while ensuring that all the sugar dissolves.  *note: i did try to substitute the sugar for a smaller amount of organic honey, but the results did not prove to be the same and affected the mixture.

The how:
1. start by washing your jars and lids to ensure they are perfectly clean    2. peel and core all your peaches and then cut the into halves or quarters (a variety is nice!).   3. make a simple medium thick syrup using the recipe above.  4. place your mason jars in the oven on the middle rack and heat to 200 degrees which allows for proper sterilization of the containers before packing   5. pour boiling water in a closed sink and place in your lids and rings so they heat up in this hot water bath (leave them in there until you need them again)   6. once the jars are heated using oven mitts carefully remove one jar and place it on the baking sheet.   7. moving quickly, but carefully (because the jars is hot), add in enough peaches to fill the container but not stuff it    8. grab your ladle and spoon over the syrup mixture onto the peaches until it reaches the neck of the jar   9. carefully place in one vanilla bean, or one one cinnamon stick into the jar    10. using  tongs grab a lid and ring from the hot water bath and seal up the jar (I recommend you use a towel or oven mitt to help protect your hands while tightening the hot jar and hot lid)   11. repeat the last 5 steps with the remaining jars and peaches keeping them all on the baking sheet without touching each other  12. place the baking sheet of jars in a cool try place and drape a towel over them.   13. leave for approximately 24 hours and then check to see if the seals have "popped" – which means they have created the proper vacuum seal   14. to check press down on the center of your jars any lids that spring back have not sealed and should be placed in the refrigerator and eaten  15. place in a cool dark storage space for up to 1 year!


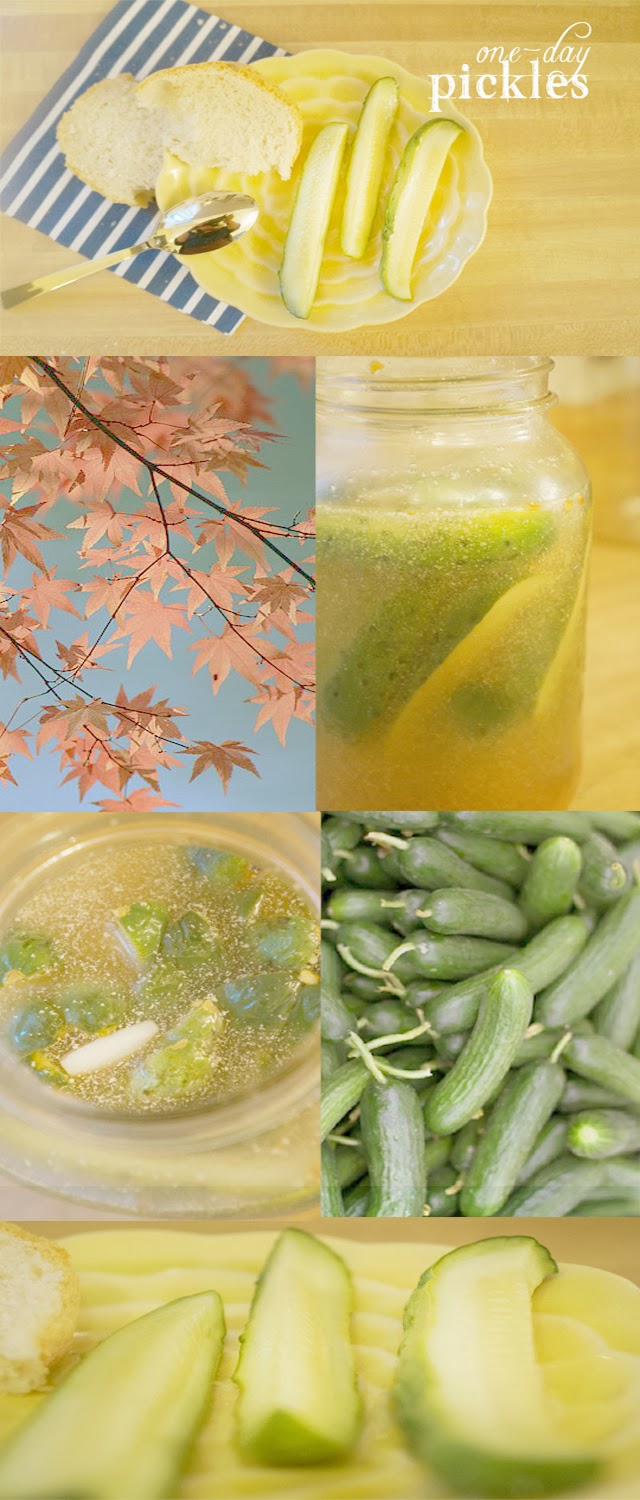
One-day Pickles

9/9/13

september is here and with that comes yummy canning season! as some of you have read a few weekends ago we did our annual tomato canning. now i'm hooked on canning anything I can get my hands on. recently on the Freutcake blog i came across a super fast and easy pickle recipe that Freutcake founder Leah Bergman hosted with Anthropologie. These easy to make one-day pickles seemed simple to do in a morning and great to enjoy by afternoon. so, i decided to give her recipe a try (which you can find in detail here on the Freutcake blog) and then modified it slightly to suit my own tastes. i have to say they turned out really good. I was impressed by how quickly the cucumbers soaked up all the flavours. this recipe has  become my new fast favourite fall sunday morning cooking project.
what you will need:
1 cup white vinegar
1/4 cup sugar
3 tsp kosher salt

1 tbsp mustard seeds
1 tsp coriander seeds
2 cups water

3 garlic cloves minced
1 tsp red chili flakes (leave these out if you don't like spice)
1 tsp tumeric
1 pounds of pickling (or as I like to call them baby) cucumbers cut in lengths


the how-to: 
Combine the vinegar, water, sugar, salt, mustard seeds, coriander seeds and tumeric in a small sauce pan on medium to high heat. Keep stirring your mixture until the sugar and salt are dissolved. Allow your mixture to cool and while you are waiting cut your cucumbers length wise and place them into a heat proof jar. Once your mixture is cool enough to touch, pour into your jar over your cucumbers. Next pop in your garlic and your chili flakes and seal it up with the cap. Place in the fridge for a few hours and then enjoy!  These one-day pickles should last up to a max of 3 weeks in the fridge.

Smoked Hickory BBQ Sauce

8/7/13

most of us enjoy a good barbeque in the summer months, but there are many of us (like myself) who barbeque all year long. nothing goes better with delicious smokey meats then some homemade barbeque sauce. here is a simple and easy to follow recipe to try this summer. after you master this, start experimenting with other flavouring options to create your own unique blend.

what you’ll need
•  1L mason jar
• 1/2 of a large sweet onion finely chopped
• 3 cloves of garlic minced
• 1 Tbsp olive oil  
• 1 Tbsp mustard powder 
 • 1 Tbsp sugar
• 4 Tbsp Worcestershire sauce 
 • 8-10 shakes (or drips) of hickory liquid smoke flavouring
• 2 Tbsp dark molasses
• 1/4 cup vinegar 
• 1/2 L of plain organic tomatoe sauce, or 1 can of crushed tomatoes
• dash of pepper & salt to taste
• hand blender, or any liquid blender 
 the how:  
now comes the easy part. grab yourself a medium to large sauce sauce pot. pour in your oil, add your onions and heat on medium to high heat until the onions are really soft. next throw in your garlic and allow it to brown just slightly while mixing frequently. then pour in your tomatoes and add in your mustard powder. mix it all together and allow that to simmer for about 10-15 minutes. following that, proceed to add in all the other listed ingredients and allow the mixture to sit for about 2 hours simmering over low heat. you want to watch that your mixture is softening and thickening up. once you are happy with your mixture remove it from the heat and allow it to cool. then take your blender and blend it all to ensure the sauce has a nice smooth consistency. then jar it and eat it!
** this barbeque sauce, should be refrigerated and eaten within approximately 2-3 weeks, unless you bottle and seal it in the proper canning fashion.

OOMPHLOVE All rights reserved © Blog Milk Powered by Blogger