A Scratch & Win Valentine

2/10/15

valentine's day is only a few days away, and if you are still looking for a unique and inexpensive gift for someone, how about this. today i am re-sharing a diy project that will teach you how to create customized scratch & win valentine cards for your sweetheart!

What you will need:
  • one piece of card stock
  • access to a colour printer
  • packing tape (or thick roll of clear tape)
  • scissors
  • metallic paint
  • dishwashing liquid
  • small paint brush 


first start out by designing your card template. next you need to add "Win A Date" or copy the of your choice, and "Scratch Me" in one or more areas. here is where you should have fun with your design, colours and wording choices to make it as unique and personal as you like. find a white clip art, or vector image of a heart (or go ahead and create your own), and place in your layout. add a small text box inside the heart where your secret message will appear. copy your entire design and paste it three times horizontally to create three side-by-side images on your page. next go back to your text boxes and type in each heart what your receiver will win.

sample secret winnings can include things like,
  • beer & board games night,
  • pho & a movie, or
  • a winter picnic.
once you are happy with your design, print it out.

now, take your packing tape and place one full strip horizontally across your design covering all three hearts. be sure to watch out for any wrinkles when laying down the strip. the packing tape now acts as a protective shield over your hidden message so they won't get damaged when painted over or when scratched. now cut away any excess tape that reaches past your page edges. next mix equal parts metallic paint (or the paint colour of your choice) to dishwashing liquid, and mix well. in thin layers, using a small paint brush, coat the area over each heart creating an outline and then filling it in. the thinner the layer the faster it will dry between coats helping to speed up this process. the object here is to layer enough coats until your message becomes hidden by opaque colour. once you are happy with your coating place your painted design in a cool dry place for a few hours (or even overnight). once it has fully dried, take your scissors and evenly slice your paper vertically into three equal strips, creating your three scratch and win cards! you can now place them in an envelope, or hand them directly to your valentine. 

I actually made these for my husband this year, so now i just have to keep him away from reading my blog until the weekend so I don't kill the surprise! I'm very much looking forward giving him these over a quiet romantic evening in front of the fireplace at home with our favourite wine and a fantastic chocolate fondue! :)

#Authentic -- DIY

9/2/14

image via

no better way to start the day than feeling fresh out of the shower.
so for an energizing start to your day, try adding fresh eucalyptus. just take the bunch and tie them with twine and wrap and tie around your shower head. when the heat shower water and steam mix with the leaves, it activates their natural oils and creates a refreshing smell. 

this is also great for if you feel stuffed up from a cold and want to wake up those nasal passages! simple. easy and green.


Dip-Dyed Valentine

1/29/14


what you need to get started:
  • white card stock
  • scissors
  • glass bowl
  • red food colouring
  • pen/pencil/stamps for love note writing
  • paper towel and/or plate as a drying station


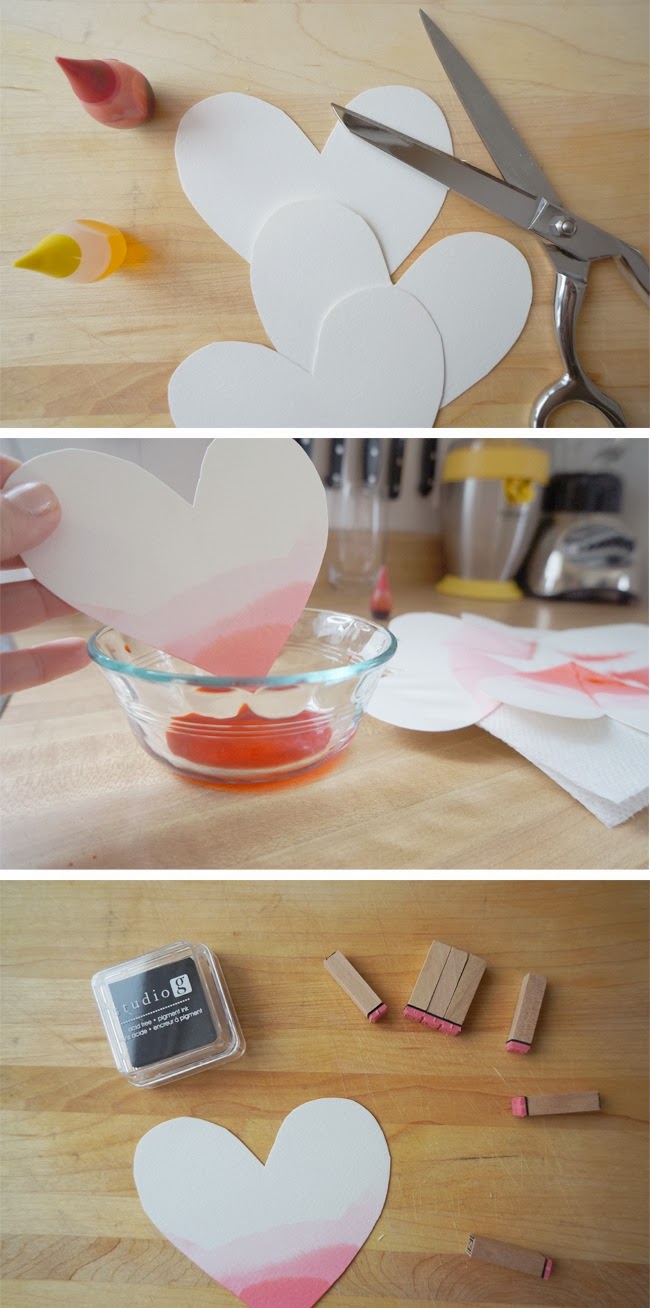
with christmas behind us, little signs of love are popping up in hearts all over the city. even with the current polar vortex chill we are experiencing, it's hard not to feel warm and fuzzy about this upcoming valentine day of love. whether you spend it with a significant other, family or close friends it's a time to celebrate with random acts of kindness and hidden surprises for those around us. this simple DIP-DYED valentine project will help you with just that. inspired by the ladies at Merrythought, this project only takes a small amount of time to get organized and complete!

start by grabbing all the supplies you need and find a clean work space. next cut your card stock into heart shapes (you can even try varying the sizes!). next place 4 drops of food colouring into your glass bowl with a 1/3 cup of water. take one of your hearts and slowly dip it into the food colouring and water mix. the trick is to bring it out slowly so it stops dripping and still holds colour, and set it on a plate or paper towel nearby. continue this process with all other paper hearts you have. next add 4 more drops of food colouring to your bowl in order to create a deeper looking colour. once your hearts are dry to the touch take them one at a time and again dip them into this richer mix, slightly lower than your first noticeable line. continue this process of adding drops and dipping until you achieve your desired look. once all of hearts have dried to the touch you can then write your sweet nothings! 

these little love notes are perfect for hiding in an unsuspecting lunch box,  pillow, or hung around the house!


OOAK 2013 Hot Holiday Picks

12/10/13

 for the past three years i have religiously attended the One of a Kind Christmas Show (#OOAKX13). each year it has been one of the best places to find unique and creative specialty gifts for anyone on your holiday shopping list. with well over hundreds of artisan to choose from, it's an inspiring event that will leave you feeling in the crafty spirit. going to a show like this gives you an opportunity to chat one-on-one with local Canadian artists about their craft and their creative process. as Canadian's we should be super proud of these talented individuals. personally, I love buying homemade artisan gifts for others. I think there is something so very touching about finding a gift that speaks to someone – that was made slowly and thoughtfully by hand.

if you are in need of holiday gift ideas, here are my top six picks for the season! 

1. PIETERSMA TINWORKS

did you know that historically tin tinsel was used on Christmas trees? designer Greg Pietersma did as he was learning the craft. after a few years he opened up a shop in Upper Canada selling not only tin tinsel, but these beautiful individually hand punched hurricane lanterns. with patterns including "the compass," "the bridal wreath" each design look stunning when lite indoors or outdoors to brighten a room.  

 2. AVRIL LORETI - MODERN HOME COLLECTION

Avril Loreti's entire collection of work is incredibly bright and colourful. I especially loved these tea towel calendars which sure you could use on a daily basis, but wouldn't they also look great draped on a wall in a home office, or a baby nursery to mark the year!

 3. MONKEY BUTTER

monkey butter is the very best new gourmet peanut butter in town (even suitable for vegetarians)! based in Vancouver a hard working trio creates these tasty treats in small batches with the utmost care. after taste testing flavors like maple bacon, white chocolate, blueberry, i dare you to just have one bite. 

4. CREATIONS LI 

artist and activist Wai-Yant creates these hilarious handle-less mugs. these slowly handcrafted eye catching creations are sure to warm the hearts of any guy or gal. I mean, how can you not love cups with teeny little faces. I mean come on!


5. GRAHAM BLAIR WOODCUTS

these woodcut prints are show stopper. based out of Newfoundland artist Graham Blair starts with a sketch that is then transferred to a wood block and then hand-carved out. following traditional Japanese methods each impression piece is then created by rubbing a bamboo spoon on the back of the block after it has been inked. due to the nature of the artwork most prints are limited editions. what a perfect conversation piece.

6. TEALISH LOOSE LEAF TEA

TeaLish is something that could be the stocking stuffer OR the perfect gift should you arrange a few options together. i literally could not walk by the booth without smelling  all the opened options. with beautiful packaging and award-winning teas, TeaLish will make seriously only coffee lover into a tea drinker.


Five Pin-tastic DIY Advent Calendars

11/27/13


let the official countdown to Christmas begin! this year why not try making your own advent calendar for something a little more creative. here are five unique ways that others are counting down down to the festive day (or week in my case!). each of these ideas  can easily be adapted every year. just fill each day with a little loving surprise like a chocolate, candy, a small toy, or a super sweet note.

1/ this DIY is made of toilet paper rolls, how brilliant is that!
3/ I love how easy each match box is to reuse and how magical it looks hung
4/ the pin me up presents, so easy and so economical to reuse the clothes pins
5/ this basket tree likely take up the most space, but would be so great for big families to share in one advent calendar

Good things come in small packages...

9/30/13


all images from http://www.drifterandthegypsy.com/little-projector-named-projecteo/. check out there review too!
have you seen this yet? it's called Projecteo and i'm completely obssessd with it because it's just so dang cute. heck, anything mini size just seems to get me.  basically it's the worlds smallest projector designed specifically to showcase your instagram pics in a unique way. that means, no more saving them to your desktop to think about printing later, or making grand plans to craft some online photobooks, or creating DIY instagram magnets. now you can take your beautiful pictures and make your own miniature 35mm slide film wheels to showcase your snaps. so how does it work?  you start by accessing your instagram account, then pick nine pictures which you upload to Projecteo. once received they are  develop onto a tiny 35mm slide film (very much like one of these, does anyone remember those???). the only other thing you need to do is buy your projector for $25.99, but once you have it you can make as many wheels ($8.99 a wheel) as you want. like i said, i am already all over this idea. i mean, you can just throw it in your pocket and off you go! perhaps this could even open up an innovative way to showcase your brand in a pitch meeting, or a memorable method of presenting quick images of an online portfolio to a possible client. the options really could be endless. apparently the saying is true, good things really do come in small packages (said this short little blogger).

Check Me Out ... Checkers

8/29/13

one of my favourite games growing up was checkers and i realized recently that i don't have any board games of my own. in fact as an adult old school board games aren't something that i seem to have acquired, but i'm starting to think it might be fun to have. one night while cooking i saw my old burnt trivet that I had been meaning to throw out and this idea popped into my head. here is a simple, quick and resourceful diy travel game which can be made in less than an hour.
if you live in Canada you know that the penny is no longer something we can use, so this DIY project also helps you find a little useful purpose for those pennies you might find laying around the house. old buttons work just as well too in case you surprisingly have no pennies.
1. grab up all the supplies you will need as listed above 2. if you don't have an old burnt trivet like me, then a piece of cardboard or even the inside of a cereal box will work. 3. take your tape and mark out a grid pattern  4. take your brush and black paint and fill in the holes on the grid with one or two coats and allow that to dry completely. 5. remove the tape and fill in the remaining square holes with your white paint to complete the look of the grid pattern. helpful hint - if you want a sharper looking grid, take a black pen or marker and outline each square for a cleaner looking style 6. once your paint has dried grab your pennies or button, partner, popcorn and beverage and play a few rounds. A super great way to recycle, reduce and reuse (insert cheesy music with that last statement.. haha!).


Pimp Ma Pencils

8/19/13

the sweet smell of fall is hitting the air and that immediately makes me crave back to school supplies and an ever fresh Starbucks Pumpkin Latte. sure i'm not in school anymore (and haven't been for a while), but that doesn't stop me. i love me some fresh new pencils and pens ... and clean white paper, and sketch pads, and erasers, and colourful pens – ok, you get the point. there is no reason why in the fall we can't still grab some new office supplies and reorganize our desk spaces.  here is a fun and fast DIY to jazz up your pencils and get yourself or your family ready for the next big project or school.
1. start by collecting all the necessary supplies: pencil(s), paint brush, paint and self-adhesive reinforcements or tape 2. place the reinforcement stickers in a random pattern on your pencil and ensure you press well so they stick  3. grab your brush and colour and paint in the centre of the circle. you will likely notice that it will take about three coats to create a nice opaque colour 4. once the colour has dried slowly peel back the reinforcements and clean off any excess adhesive from the sticker 5. sharpen that bad boy and enjoy!
helpful hint - if you want to paint stripes or lines lightly sand that section pencil first

How to make someone happy.

2/8/13

How to make someone happy. Choose any one of the follow items above for guaranteed smile on Valentines day. For as much as some people like to moan and complain that this day is just for girls or is all about consumer greed, I propose thinking of it as a day to remind myself to appreciate others. It's not about the gifts or anything to do with money, it about doing something nice for someone else. It's generous acts of kindness that on a day-to-day basis we forget because we are all overly busy. Let it be a day to put yourself and your actions in check. Any of the ideas listed above are more thought than the price tag. Make someone breakfast in bed before they get up, take the time to paint or design a homemade postcard for a friend. Create hearts out of felt and put in a fun coupon or fortune for kids, or dip cherries in chocolate and enjoy them with a friend. For the extra adventurous reader,  mix and match all the items you see. Or even just do a random act of kindness for someone in need. Voila! Watch smiles grow and make your guts feel good on the inside. 

xoxox.

Recycled & Restyled

8/7/12

With a bunch of summer birthday's, upcoming weddings and friends having babies, I'm constantly gift wrapping lots of little goodies, but lately I've decided to make more of a conscious effort to upcycle instead of buying wrapping paper, and cut back on my environmental waste. My always clever thinking boyfriend fiance (ever since I have known him) has more often than not wrapped my gifts with old newspapers, picking the fun sections that he knows I like. This idea here using magazines, is not so different from that. 
Start by selecting a few publications that you no longer need, then tear out a number of pages and trim the edges. Often times, I tend to select pages that relate to the gift I am giving. Depending on the size of your item, tape together the appropriate number of tear pages that will give enough coverage. In the gift you see here, I needed four pages to wrap a set of six steak knives. Since some magazine paper is thinner than others, I suggest using a little tissue paper or kleenex around your item as padding to help avoid any tearing of thin paper when wrapping. Add a homemade bow, or colourful card and you're done! Get inspired and also try using old poems, maps, CD covers or posters. Take brown paper bags and stamp/paint on a metallic pattern, or wrap it with colourful tape. Try making bows, puffs, or other decorative pieces out of recycled items to add on the top of your gifts. There are so many options and none of these will hurt your wallet. For other ideas, check out Furokshiki or Wrap It Up: Holiday gift giving

DiY : Paper Flowers

7/17/12

Since our engagement party I have had a lot of people ask me how we created the red paper flowers that we used as centerpieces. Well, here is the step-by-step process how we did just that. About a week before the party my middle sister and I stayed in, put on some cheesy tv, comfy clothes and hunkered down to make these pretty paper flowers. Once we got into the groove of creating them, we started to produce them rather quickly, as you will see if you try this DIY project.
1. Start by collecting your supplies - you will need, scissors, tissue paper and pipe cleaners/wire. 2. Gather about 10 sheets of tissue paper (play around with mixing different colour shades for flowers with more dimension as well), stack them, then fold it all and cut it in half.  3. Take one half of your cut stack and begin to fold it like an accordion. 4. Be sure to cut off any extra that doesn't line-up.  5. Next fold your accordion in half. 6. Take your pipe cleaner/wire and tie it around the middle of our folded accordion, making sure to leave extra pipe cleaner/wire to create the look of the stem. 7. Then grab the ends of your accordion and trim until you have achieved the desired shape of your flower petals (rounded corners works best it from my experience). 8. Spread the accordion folds between your fingers and very slowly (and gently) pull out each piece of tissue paper towards you. 9. Slowly pulling each sheet until you begin to create the shape of a flower, being careful not to pull too hard and rip the delicate paper. 10. Finally work away at "puffing" out the flower until you have it exactly how you want it to look, then place on display. Heck, you could even try misting them with perfume to give them a soft sent.  If anyone tries this, please share a comment of your success or new ideas!

Our Engagement Party

7/11/12

At the end of June we celebrated our engagement with a party. It was a great chance for both sides of our families to mix and mingle in a fun and semi-formal way! There was lots of bright colours, handmade pasta, balloons, red velvet cake and DIY decorations. The day was filled with overwhelming generosity and love. We are both so very blessed to have such lovely people in our lives. We now cannot wait to decorate and use some of the fantastic items we received in our new home! Now with the party being over we are even more eager for the upcoming partying that will take place at our wedding. To everyone who made that day so memorable – a HUGE thank you. To go along with this post listen and enjoy the new playlist in the player! Ps. I decided to post this on our very last anniversary as a "dating" couple, before the adventure begins. Happy 9 years to you babe! I could never have found anyone better than you.

D i Y : Wrap & Wear Bracelets

5/29/12

For hot summer weather, I love the look of woven or wrapped accessories. Especially if those items are made from raw materials like hemp or straw, it just gives a a very nautical inspired feel. Whether it is handbags or jewelery, these are often easy and very inexpensive looks that can be created at home in little time. Layering one or two of these wrapped pieces in combination with a well placed brass or beaded bracelet is a great look for summer. Here is a quick DIY project for anyone looking to create their own colourful wrapped accessories to add to any boat and beach wardrobe. Supplies You Will Need: Colourful hemp, leather or even yarn, hot glue gun and old bracelets to be upcycled
Start by gathering all your supplies and find a clean work surface that is ok to get a little sticky. Next plug in your hot glue gun. While it heats up, cut different lengths of colourful hemp, leather or yarn, depending the look you want. If you are making more than one, try and create some variety in your designs to make them more visually interesting when you wear them. Next, working slowly across the bracelet add a small amount of hot glue then work quickly to wrap a few very tight strands of your material. Be sure to work with only a little glue at a time and press firmly with the material. Continue wrapping until you achieve your desired look. For the ends of a strand coat both sides of your material with the glue and connect one end strand to the start of another new strand to ensure that neither will come loose while wearing. Once all your accessories are done, let them dry well and then wear.

D i Y: Summer fresh buds

5/24/12

Now that summer has basically arrived (hello mr. heat), it is time to add a little more vibrant colour to our living our spaces. I recently took an old 25 cent bud vase from a second hand shop and added some new razzle dazzle to it. I love the result. It is much more colourful and an item that can be used to house flowers on a table, make-up brushes in a bathroom or pens at the office.
What You Will Need: A glass vase of any size (personally I like to collect lots of little bud to have around the house), acrylic paints, masking tape, ice cube tray,  two paint brushes, small amount of mod podge.
The Process: Start by cleaning your glass vase so it is nice and fresh and rid of dust. Next decide on the pattern you want to paint and mark it off with tape. If you are doing lines, be sure to try and get them as evenly spaced as possible. You can also try cutting out dots, or various shapes on paper and then tape the paper to the vase much like a stencil. Next decide on your colour choice, or try mixing various colours and shades. I like using ice cube trays when pouring and mixing paints. It keeps the colours seperate from mixing and are very easy to clean afterwards. Once you have your colour being to paint and be sure to put a nice thick layer. While the paint is still wet pull off the tape slowly to ensure nice clean lines. Then set aside and let the vase dry (I recommend leaving it over night). Once it is fully dry take a little mod podge and apply a thin coat over the painted area by hand to give it a  final seal.  Then just add your items or flowers like these homemade craspedia.

DiY: Needles & threads

5/9/12

With Mother's Day just around the corner here is a simple DIY card project for anyone looking for a creative and quick idea. This is actually something I've been meaning to try since I recently was cleaning up shop and noticed an abundance of brightly coloured embroidery thread from a multitude of years gone by. 

Photo credit: http://creativecollectiveblog.com
To get started all you need is a pencil, colourful thread, needle, sissors, cardboard or cardstock and extra items like buttons, markers etc. (depending on your design idea). Then start out by sketching an outline of your design on the paper. I recommend using either cardboard or cardstock as it will be heavy enough not to rip when sewing. To help with the stitching aspect, take your needle and poke holes in the outline of your design to act as an easy-to-follow guide.

Photo credit: http://toostinkincute.blogspot.ca; http://www.flaxandtwine.com

Then thread an embroidery needle and get going! Be sure to either tape the end of the thread, to mark the starting point, or make a good solid knot that won't fit through the hole of your first stitch. It is helpful if you know a few basic embroidery stitches to help speed things along, so for further information on some techniques, click here. Buttons can be added/layered on to give extra decoration, or even sewn around to create the look of flowers. Try stitching letters, or even simple repetitive patterns and shapes on their own. Once you have the design how you like it, then just sign the inside and pass lovingly to Mom's. 

Here is a little music to enjoy while you work on this project.


DiY: Grapevine Lights

4/20/12

For this post, total credit goes to design extraordinaire Lynne Knowlton of the blog Design The Life You Want to Live. This exceptionally talented and lovely lady is the mastermind behind these absolutely stunning DIY grapevine lighting balls. Her easy to follow outline, along with beautiful photography, will allow you to create these lovely works of art for any backyard, porch, or tabletop centerpiece. To view her step-by-step DIY process (with added bits of hilarious humor), visit her full blog post by clicking here.

Photo credit: http://www.lynneknowlton.com/
 Below is an overview of the basic supplies needed and steps to follow as seen on her blog.

THE SUPPLIES :
1.  Grapevine (fairly easy to find in Canada) or wire can be used
2.  Wire to secure the grapevine in place
3.  Wire cutters
4.  Beach balls (an easy to deflate one)
5.  Strings of twinkle lights

THE PROCESS:
Clean the grapevine of any leaves, then begin to wrap it around the inflated beach ball.  Pre-cut some wire so you have it ready at hand. Start to wrap the beach ball with the vine and secure it with the wire as you go along. Make sure to leave room between the wrapped vines to pull out the beach ball. Once you have a good looking start to the ball shape, deflate and remove the beach ball. Continue to wrap the vines until you have a very thick and sturdy ball shape. Next wrap your mini lights around the ball(s) until you are happy with the results. Hang or place, plug in, and enjoy!

Check out the rest of her blog, and her unreal adult treehouse, which I hope to one day create for myself!


Engagement Postcards!

4/13/12

Signed, sealed and delivered! Our engagement party postcards are officially out the door! Now we look forward to this little family meet and greet summer celebration shindig.


When it came to deciding on what we wanted to do for the invite, we both knew we wanted to make something ourselves and inject it with personality. So, from that we decided on the idea of a DIY postcard and thought with a photo on the front it makes a nice keepsake for family. In doing a postcard format we also really liked that we could then handwrite each one to give them a more personal touch. It’s an easy item to create (but ensure you check with the post office for weight requirements and post marking areas before printing) and saves on the cost of envelops. After scratching through a bunch of layouts and ideas, here is what we created! We are so thrilled with how they turned out (and not to mention we got some great engagement shots from it as well which I will post at a later date) we would highly recommend this option for any event. However, once we got going we couldn’t have pulled this project off so successfully without the help of some very lovely friends. Shout outs to: Shelley Tavares (amazing photo taking and photoshop teachings) Chris Johnstone (support and design tech skills) and Giovanni Rimasti Illustrations (assistance with layout construction and good cheap printer contacts). After finally sending these beautiful postcards out, I find I just can't wait to marry my bestfriend.

The Luckiest by Ben Folds Five on Grooveshark

Easter Festive

4/5/12

Easter is often a time we spend enjoying the company of our families and great friends! With the holiday long weekend quickly approaching, here are some clever ways to help you celebrate the upcoming festivities! Personally, I find I have a soft spot for Easter because of its continued creative uses of Spring colours.

Photo credit clockwise: http://pinterest.com/pin/117093659031640931/; http://www.sugarandcharmblog.com; www.design-cupboard.com; carolynshomework.blogspot.ca; http://www.paigeandchris.com/; www.design-cupboard.com.

(The links here are matched with the images above reading clockwise. Enjoy!)

DiY: What's old is new again

4/3/12

Photo credit: thetwentysomethingblog.wordpress.com

Many times we look in our make-up drawers and find that we have, over the years, neglected various items. Perhaps they got forgotten as our favourite new products make their way into our homes; or perhaps a certain item was something we may have not totally loved but received as a gift. Regardless of what the case maybe here is an extremely simple and savvy way to upcycle old eye shadows into new nail polishes. Or, for those that may not have older products sitting around hidden in drawers, here is a great opportunity to create your own custom nail polish colour palette.

Here is what you will need:
    - Clear nail polish
    - Eye shadow
    - Small container
    - Stir stick
    - Nail polish remover


Just following this simple three step process:

  1.  Star by pouring some of the clear polish into a small container.
  2.  If your eye shadow isn't the loose kind, crush it first. Then scoop out and add small 

       amounts of eye shadow into the polish.
  3.  Continue gradually adding small amounts of eye shadow to the mixure while frequently  

       stirring (keep in mind that for a more opaque finish you will need to continue adding      
       more colour) and once you have your desired shade, voila, polish away!

To get even more creative, try making your own colour, by mixing eye shadows. If at anytime the polish gets too thick, add a small amount of remover to thin it out. Save the polish in a small glass container in a cool dry place for future use.

DiY : Chalk it up weekend

3/30/12

There are so many different creative uses for that ever popular chalkboard paint! Since today is Friday, here is a simple weekend DIY project that will help you organize your kitchen and add a little personal touch to your space.

Photo Credit: Flickr.com - small::bird; theartistandthecarpenter.blogspot.ca; accomacinn.com
Just follow the steps outlined below for a quick how to tutorial. 
To make this project even simpler, find a craft store near you that sells either chalkboard stickers or wallpaper, and cut out your desired lid size from that. 

Photo credit: www.ikatbag.com; www.merrimentdesign.com; acozykitchen.com; healthymamma.wordpress.com
Hope this adds a little fun to your upcoming weekend plans! Happy Friday everyone! xoxo

OOMPHLOVE All rights reserved © Blog Milk Powered by Blogger