A Scratch & Win Valentine

2/10/15

valentine's day is only a few days away, and if you are still looking for a unique and inexpensive gift for someone, how about this. today i am re-sharing a diy project that will teach you how to create customized scratch & win valentine cards for your sweetheart!

What you will need:
  • one piece of card stock
  • access to a colour printer
  • packing tape (or thick roll of clear tape)
  • scissors
  • metallic paint
  • dishwashing liquid
  • small paint brush 


first start out by designing your card template. next you need to add "Win A Date" or copy the of your choice, and "Scratch Me" in one or more areas. here is where you should have fun with your design, colours and wording choices to make it as unique and personal as you like. find a white clip art, or vector image of a heart (or go ahead and create your own), and place in your layout. add a small text box inside the heart where your secret message will appear. copy your entire design and paste it three times horizontally to create three side-by-side images on your page. next go back to your text boxes and type in each heart what your receiver will win.

sample secret winnings can include things like,
  • beer & board games night,
  • pho & a movie, or
  • a winter picnic.
once you are happy with your design, print it out.

now, take your packing tape and place one full strip horizontally across your design covering all three hearts. be sure to watch out for any wrinkles when laying down the strip. the packing tape now acts as a protective shield over your hidden message so they won't get damaged when painted over or when scratched. now cut away any excess tape that reaches past your page edges. next mix equal parts metallic paint (or the paint colour of your choice) to dishwashing liquid, and mix well. in thin layers, using a small paint brush, coat the area over each heart creating an outline and then filling it in. the thinner the layer the faster it will dry between coats helping to speed up this process. the object here is to layer enough coats until your message becomes hidden by opaque colour. once you are happy with your coating place your painted design in a cool dry place for a few hours (or even overnight). once it has fully dried, take your scissors and evenly slice your paper vertically into three equal strips, creating your three scratch and win cards! you can now place them in an envelope, or hand them directly to your valentine. 

I actually made these for my husband this year, so now i just have to keep him away from reading my blog until the weekend so I don't kill the surprise! I'm very much looking forward giving him these over a quiet romantic evening in front of the fireplace at home with our favourite wine and a fantastic chocolate fondue! :)

DIY - Industrial Accents

10/15/14

this post topic may not be a newbie, but it's a goodie for sure.
after being in our house for over a year, we decided it was high time best to start hanging up some permanent fixtures, like ... curtains. 


we both love the fancy restoration hardware look, but definitely can't afford the prices at this stage in our life. so, we figured we would diy something we felt was just as good. welcome, our industrial pipe curtain rod! simple, fast and affordable. beat that fancy stores!

if you want to try this yourself, here is what you'll need and the how too:

1. buy a piece galvanized pipe (be SURE to clean it or you'll get back oil on your hands and curtains - i learned that the hard way) in your desired length and two toggle bolts to help support the weight of the piping curtain rod
2.  you'll also need to buy the flat piece which affixes to the wall, called an iron floor flange, and the macaroni looking piece, formally called the galvanized elbow, to connect your pipe to the flange 
3. once you have washed and cleaned (and if desired, spray painted), you are now ready to start the assembly
4. start by putting your curtains on your galvanized pipe facing the correct way 
5. next holding screw all the pieces of your pipe curtain rod together
6. now hold up the assembled curtain rod (you may need an assistant) and mark your drill holes on the wall 
6. put everything down and insert your toggle bolts 
7. pick-up your piping with curtains already on, line it all up and drill, baby drill (just make sure your curtain is already arranged facing the correct direction ... we also learned that one the hard way)

creating your own curtain rod out of galvanized piping allows you the flexibility to customize your rod for any sizing you need, and allows you the ability to turn corners for a corner windows. if the industrial look isn't your thing, you can easily spray paint the whole thing before assembling it in any desired colour.

helpful hints: 

  • at your local hardware store, ask if they can cut and thread the end of the galvanized pipe in the exact length that you need. This will be safer and you'll ensure it's the extract length required. 
  • also, unless your using shower curtain hooks, once this puppy goes up, those curtains ain't easily coming down - at all. so if you like to do more than steam clean your curtains  it's something to think about before screwing it all in and having an "oh-crap" moment.


Bottle the Last of Summer - DIY Scrub

9/8/14

not ready for summer to be over yet? make those last summer days linger a little longer with this simple scrub using farm fresh ingredients. shower scrubs are a simple thing you can easily make. they keep your skin soft and keep a little extra coin in your pocket when you make it yourself. this pear and orange mix is one i made this past week. it's smells like summer and the honey mix is heaven on the skin.


what you need:
  • 1 quarter of an orange
  • 1 half of a pear
  • 1 cup sugar
  • 1 tbsp coconut oil
  • 1 tsp honey
start out by blending your pear so that it creates a soft mixture. next add all your other ingredients listed and stir well together with a spoon. store in an air tight glass jar in your bathroom and try to use within 2-3 max max. I tend to use my homemade scrubs 3-4 times a week, just make sure to rinse well! 

helpful hint - if your mix is a little too liquid for your taste add more sugar to thicken it out.

#Authentic -- DIY

9/2/14

image via

no better way to start the day than feeling fresh out of the shower.
so for an energizing start to your day, try adding fresh eucalyptus. just take the bunch and tie them with twine and wrap and tie around your shower head. when the heat shower water and steam mix with the leaves, it activates their natural oils and creates a refreshing smell. 

this is also great for if you feel stuffed up from a cold and want to wake up those nasal passages! simple. easy and green.


#AuthenticLiving – Natural Summer Toner

8/26/14

image via

the summer season is the one time of year that can sometimes play havoc on my oily sensitive skin, so having a good toner on hand can be very helpful in my experience. because of my recent healthier natural living overhaul, i'm more particular now that much of what i put on my skin should be from natural sources. in fact, i believe that some of the best items can be made a home like this simple skin toner.

All natural Skin Toner & Cleanser
  • 1/4 cup witch hazel
  • 2 tbsp apple cider vinegar
  • 5 drops of essential oil (i like using a spearmint, lavender or lemon in the summer)
mix all the ingredients together and store in a glass container in a cool dark space. for best use i recommend using it a few minutes after face washing. you can also consider storing the mixture in a small spray bottle in the fridge to mist on face throughout the day to help cool you down during the summer. 

*Helpful Hint - Apple Cider Vinegar offers great health benefits. i even take a Tsp a day in the morning to help with good digestion and improve my skin from the inside out!

Reno Report - How To Build A Stone Walkway

7/2/14


this past Canada Day long weekend we paid a little much needed attention to the outside of our house. as you can clearly see, our home is situated on a pretty steep slope, which can make walking down the side of our house very risky. because of that area being our access to the backyard, our grass actually doesn't even want to grow there anymore, so in most cases you just slide yourself down a little mud patch. not so fun when with a lawn mower or when balancing a tray of drinks, etc. being the home DIYer's that we are trying to be, we decided we would tackle building our own stone walkway to give us a much better walking path. after some research, reading and a car load of supplies from the always helpful, Home Depot, we finally managed to cross this project off our list and it has made a world of difference.


so, for anyone who is looking to add a little curb appeal, or function to your yard, here is our simple "how-to" for building your own stone walkway.

first start out by deciding on the stones you want to use. we were fortunate that we had been given some leftover concrete paver stones pieces from a project on another house, so we decided to take this opportunity to use those. once you have the stone pieces you wish to use, the next thing to do is to layout your pattern in the way in which you want it to appear when finished. as i mentioned the side walkway for us had little to no grass growing because of all the slipping and sliding, so we decided to arrange our stones 6 inches a part in the hopes of laying some grass seed between the stones and encourage some growth. fingers crossed!


once you have decided on your patten, you then need to mark the stone area. we used a flat edged shovel and cut around the perimeter of the stone creating a guided area to dig within. once you have your outline cut, dig out 6 inches of grass and earth to create an even hole. it is important to ensure you go at least 6 inches deep so that you can create a strong solid base for your stone path. next add a layer of landscape fabric cut to the size of your hole. this fabric is designed to help stop weed growth, encourage proper water drainage and to create a good non-slip base for your gravel fill to sit on. once your landscape fabric is in place, start adding in your gravel stones until you reach 3 inches thick. next add in 2 inches worth of screening (a very fine sand/stone) on top. using a level, or something with a straight edge, move the screening around in the hole to ensure a nice flat and level surface. be sure to consider how you want water to run away from you house and adjust any slightly curves or angles with your stone with that in mind.


once your think your screening is level, using a tamper, compress your sand mixture. this helps to ensure that all the sand and stones have started to settle into all the small cracks and grooves, making a nice even surface for your stone to sit on. once you have finished tamping, add your stone into the hole. if it doesn't sit flat and level to the ground, readjust by adding or moving the screening around. once you are happy with how the stone is sitting fill ing any surrounding cracks or holes with the earth you pulled out. make sure you pack it tightly enough to create a nice seal.


work your way stone by stone down your path until voila, your beautiful walkway is complete! as you can see from our yard we still have a lot on our "to-do" side of the house list, but at least we have one thing crossed off for now! this path now makes it much easier for us to carry working supplies for more projects, or food and drinks down for summer patio parties!

Dip-Dyed Valentine

1/29/14


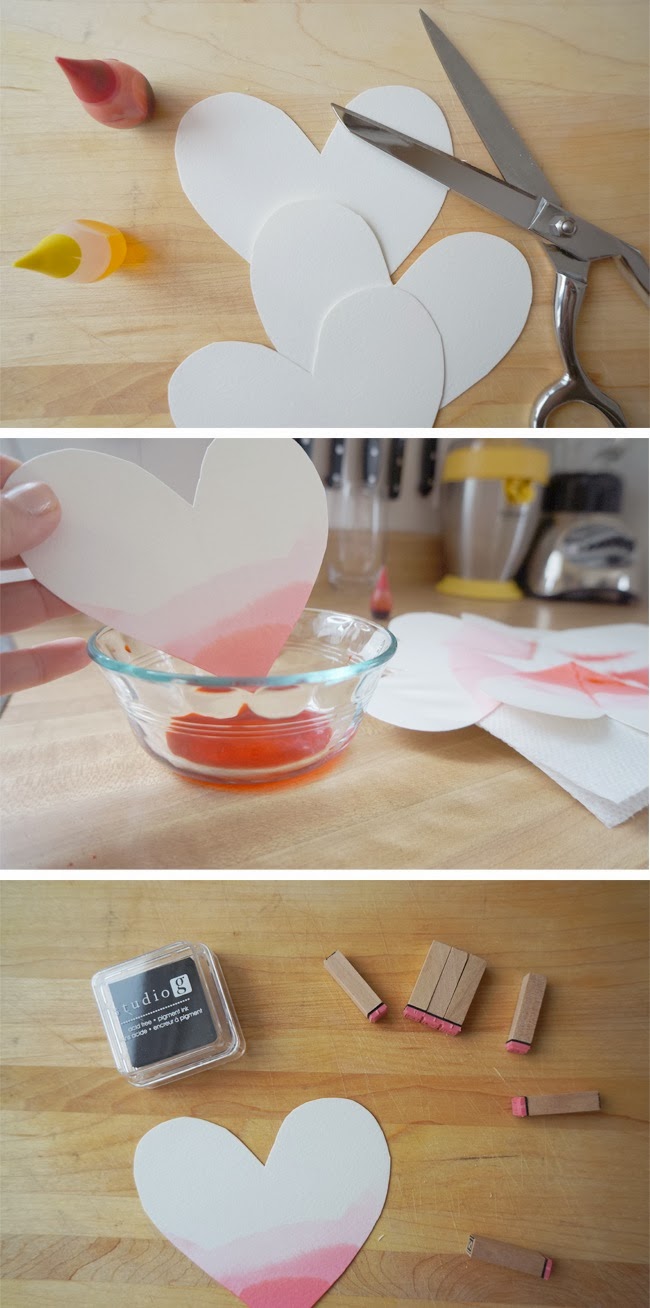
what you need to get started:
  • white card stock
  • scissors
  • glass bowl
  • red food colouring
  • pen/pencil/stamps for love note writing
  • paper towel and/or plate as a drying station


with christmas behind us, little signs of love are popping up in hearts all over the city. even with the current polar vortex chill we are experiencing, it's hard not to feel warm and fuzzy about this upcoming valentine day of love. whether you spend it with a significant other, family or close friends it's a time to celebrate with random acts of kindness and hidden surprises for those around us. this simple DIP-DYED valentine project will help you with just that. inspired by the ladies at Merrythought, this project only takes a small amount of time to get organized and complete!

start by grabbing all the supplies you need and find a clean work space. next cut your card stock into heart shapes (you can even try varying the sizes!). next place 4 drops of food colouring into your glass bowl with a 1/3 cup of water. take one of your hearts and slowly dip it into the food colouring and water mix. the trick is to bring it out slowly so it stops dripping and still holds colour, and set it on a plate or paper towel nearby. continue this process with all other paper hearts you have. next add 4 more drops of food colouring to your bowl in order to create a deeper looking colour. once your hearts are dry to the touch take them one at a time and again dip them into this richer mix, slightly lower than your first noticeable line. continue this process of adding drops and dipping until you achieve your desired look. once all of hearts have dried to the touch you can then write your sweet nothings! 

these little love notes are perfect for hiding in an unsuspecting lunch box,  pillow, or hung around the house!


The Little Home Office That Could

12/4/13


sometimes people ask me where i blog from, well the answer is i blog from my newly completed little home office. when we bought our house, the space which is now our office, was used as a small spare bedroom for visiting  out of town guests by the previous owner. since right now it's just the two of us sharing this home, and we have more bedrooms than we could need at the moment, we decided  to turn this small space into a working library/home office. after a bit of brainstorming and strategic pinning we came up with the best design plan for what we envisioned for this area. before you renovate or redo any room, it's important to ask yourself what you need out of the space and assess what you want will make this area unique to you. what "things" will you need to house there? what's function does this room serve? how often will it be used? do you want a comfortable casual space, or a more formal one? it's important to plan properly in order to save yourself  the extra hard earned pocket money, and the heart ache to redo it.
 
for us the answers quickly came down to maximum storage and function. we both do a lot of work from home so we definitely needed enough surface desk space that we could both easily spread out paperwork. secondly we needed to effectively store office supplies and keep all my art supplies within reach. we then came to realize that we have a TON of books that we needed to still unpack (after a year of having them in boxes). clearly in the modern age of kobo's and online readers, we still cannot pry ourselves away from good old hardcopy books. lastly, photography is a huge passion of mine (which you can see more of here), so we wanted a place to store reference books, old photographs,  albums and camera equipment all together.

much like the "pinspiration" images above, we agreed on creating a cozy dark space, with deep rich tones and library inspired wall-to-wall shelving. as a finished space we wanted it to feel an inviting place to work

to give you some background, here is the room before ....
and here is what it looks like today!


i LOVE how this turned out. the room immediately looks so much bigger than before. after a bit of back and forth with the furniture placement, we finally figured out that the L-shaped layout of desks was the configuration that maximized the best working surface space. by also mixing Ikea Expedit and Ikea Billy shelving with the Rubbermaid track shelving for it not only create a healthy balance of visual depth and interest, but it also quickly increased our storage space and achieved the library look we were after. much the opposite of what you might think, ceiling to floor shelving in a small space can actually increase the visual height and width of a room. the trick is just to keep the shelving to two or three walls.  if you can't use shelving, stack diploma's or a series of framed abstract art above a desk up to draw the eye up towards the ceiling and around the room. in this office we wanted to go with a dark and cozy feeling which is why we painted the walls light and used a blended mix of warm wood tones and dark brown/black to off set the colourful books and objects that adorn the shelves. as a helpful tip create the look of a bigger space in a small room, paint shelving in a tone the same or similar to that of your wall colour. now that this room is finally organized, I love coming into this office and working in this space. in fact, i the day we brought home the small succulent plants for the office was the day this room officially finally felt finished to me!
 
now every time we go in our library home office, we feel organized, at ease and ready for business.

Our Office Supply List


Five Pin-tastic DIY Advent Calendars

11/27/13


let the official countdown to Christmas begin! this year why not try making your own advent calendar for something a little more creative. here are five unique ways that others are counting down down to the festive day (or week in my case!). each of these ideas  can easily be adapted every year. just fill each day with a little loving surprise like a chocolate, candy, a small toy, or a super sweet note.

1/ this DIY is made of toilet paper rolls, how brilliant is that!
3/ I love how easy each match box is to reuse and how magical it looks hung
4/ the pin me up presents, so easy and so economical to reuse the clothes pins
5/ this basket tree likely take up the most space, but would be so great for big families to share in one advent calendar

Check Me Out ... Checkers

8/29/13

one of my favourite games growing up was checkers and i realized recently that i don't have any board games of my own. in fact as an adult old school board games aren't something that i seem to have acquired, but i'm starting to think it might be fun to have. one night while cooking i saw my old burnt trivet that I had been meaning to throw out and this idea popped into my head. here is a simple, quick and resourceful diy travel game which can be made in less than an hour.
if you live in Canada you know that the penny is no longer something we can use, so this DIY project also helps you find a little useful purpose for those pennies you might find laying around the house. old buttons work just as well too in case you surprisingly have no pennies.
1. grab up all the supplies you will need as listed above 2. if you don't have an old burnt trivet like me, then a piece of cardboard or even the inside of a cereal box will work. 3. take your tape and mark out a grid pattern  4. take your brush and black paint and fill in the holes on the grid with one or two coats and allow that to dry completely. 5. remove the tape and fill in the remaining square holes with your white paint to complete the look of the grid pattern. helpful hint - if you want a sharper looking grid, take a black pen or marker and outline each square for a cleaner looking style 6. once your paint has dried grab your pennies or button, partner, popcorn and beverage and play a few rounds. A super great way to recycle, reduce and reuse (insert cheesy music with that last statement.. haha!).


Pimp Ma Pencils

8/19/13

the sweet smell of fall is hitting the air and that immediately makes me crave back to school supplies and an ever fresh Starbucks Pumpkin Latte. sure i'm not in school anymore (and haven't been for a while), but that doesn't stop me. i love me some fresh new pencils and pens ... and clean white paper, and sketch pads, and erasers, and colourful pens – ok, you get the point. there is no reason why in the fall we can't still grab some new office supplies and reorganize our desk spaces.  here is a fun and fast DIY to jazz up your pencils and get yourself or your family ready for the next big project or school.
1. start by collecting all the necessary supplies: pencil(s), paint brush, paint and self-adhesive reinforcements or tape 2. place the reinforcement stickers in a random pattern on your pencil and ensure you press well so they stick  3. grab your brush and colour and paint in the centre of the circle. you will likely notice that it will take about three coats to create a nice opaque colour 4. once the colour has dried slowly peel back the reinforcements and clean off any excess adhesive from the sticker 5. sharpen that bad boy and enjoy!
helpful hint - if you want to paint stripes or lines lightly sand that section pencil first

How to make someone happy.

2/8/13

How to make someone happy. Choose any one of the follow items above for guaranteed smile on Valentines day. For as much as some people like to moan and complain that this day is just for girls or is all about consumer greed, I propose thinking of it as a day to remind myself to appreciate others. It's not about the gifts or anything to do with money, it about doing something nice for someone else. It's generous acts of kindness that on a day-to-day basis we forget because we are all overly busy. Let it be a day to put yourself and your actions in check. Any of the ideas listed above are more thought than the price tag. Make someone breakfast in bed before they get up, take the time to paint or design a homemade postcard for a friend. Create hearts out of felt and put in a fun coupon or fortune for kids, or dip cherries in chocolate and enjoy them with a friend. For the extra adventurous reader,  mix and match all the items you see. Or even just do a random act of kindness for someone in need. Voila! Watch smiles grow and make your guts feel good on the inside. 

xoxox.

Recycled & Restyled

8/7/12

With a bunch of summer birthday's, upcoming weddings and friends having babies, I'm constantly gift wrapping lots of little goodies, but lately I've decided to make more of a conscious effort to upcycle instead of buying wrapping paper, and cut back on my environmental waste. My always clever thinking boyfriend fiance (ever since I have known him) has more often than not wrapped my gifts with old newspapers, picking the fun sections that he knows I like. This idea here using magazines, is not so different from that. 
Start by selecting a few publications that you no longer need, then tear out a number of pages and trim the edges. Often times, I tend to select pages that relate to the gift I am giving. Depending on the size of your item, tape together the appropriate number of tear pages that will give enough coverage. In the gift you see here, I needed four pages to wrap a set of six steak knives. Since some magazine paper is thinner than others, I suggest using a little tissue paper or kleenex around your item as padding to help avoid any tearing of thin paper when wrapping. Add a homemade bow, or colourful card and you're done! Get inspired and also try using old poems, maps, CD covers or posters. Take brown paper bags and stamp/paint on a metallic pattern, or wrap it with colourful tape. Try making bows, puffs, or other decorative pieces out of recycled items to add on the top of your gifts. There are so many options and none of these will hurt your wallet. For other ideas, check out Furokshiki or Wrap It Up: Holiday gift giving

D i Y : Wrap & Wear Bracelets

5/29/12

For hot summer weather, I love the look of woven or wrapped accessories. Especially if those items are made from raw materials like hemp or straw, it just gives a a very nautical inspired feel. Whether it is handbags or jewelery, these are often easy and very inexpensive looks that can be created at home in little time. Layering one or two of these wrapped pieces in combination with a well placed brass or beaded bracelet is a great look for summer. Here is a quick DIY project for anyone looking to create their own colourful wrapped accessories to add to any boat and beach wardrobe. Supplies You Will Need: Colourful hemp, leather or even yarn, hot glue gun and old bracelets to be upcycled
Start by gathering all your supplies and find a clean work surface that is ok to get a little sticky. Next plug in your hot glue gun. While it heats up, cut different lengths of colourful hemp, leather or yarn, depending the look you want. If you are making more than one, try and create some variety in your designs to make them more visually interesting when you wear them. Next, working slowly across the bracelet add a small amount of hot glue then work quickly to wrap a few very tight strands of your material. Be sure to work with only a little glue at a time and press firmly with the material. Continue wrapping until you achieve your desired look. For the ends of a strand coat both sides of your material with the glue and connect one end strand to the start of another new strand to ensure that neither will come loose while wearing. Once all your accessories are done, let them dry well and then wear.

D i Y: Summer fresh buds

5/24/12

Now that summer has basically arrived (hello mr. heat), it is time to add a little more vibrant colour to our living our spaces. I recently took an old 25 cent bud vase from a second hand shop and added some new razzle dazzle to it. I love the result. It is much more colourful and an item that can be used to house flowers on a table, make-up brushes in a bathroom or pens at the office.
What You Will Need: A glass vase of any size (personally I like to collect lots of little bud to have around the house), acrylic paints, masking tape, ice cube tray,  two paint brushes, small amount of mod podge.
The Process: Start by cleaning your glass vase so it is nice and fresh and rid of dust. Next decide on the pattern you want to paint and mark it off with tape. If you are doing lines, be sure to try and get them as evenly spaced as possible. You can also try cutting out dots, or various shapes on paper and then tape the paper to the vase much like a stencil. Next decide on your colour choice, or try mixing various colours and shades. I like using ice cube trays when pouring and mixing paints. It keeps the colours seperate from mixing and are very easy to clean afterwards. Once you have your colour being to paint and be sure to put a nice thick layer. While the paint is still wet pull off the tape slowly to ensure nice clean lines. Then set aside and let the vase dry (I recommend leaving it over night). Once it is fully dry take a little mod podge and apply a thin coat over the painted area by hand to give it a  final seal.  Then just add your items or flowers like these homemade craspedia.

Eco-Friendly Wrapping : Furoshiki

12/13/11

Asian Canadian arts and culture magazine, Ricepaper, published an article in 2010 on the art of furoshiki – a type of traditional Japanese wrapping cloth used in various folding patterns to transport clothes, gifts, or other goods. According to research furoshiki dates back as far as the Nara period, with its name, meaning "bath spread" derived from the Edo period practice of using them to bundle clothes while at the sentō (public baths). Over time, the furoshiki’s usage extended to serve as a means for merchants to transport their wares or to protect and decorate a gift. Modern furoshiki can be made out of a variety of cloths, including silk, chirimen, cotton, rayon, and nylon. It is not most commonly seen used to wrap and transport lunch boxes (bento) and often double as a table mat. On March 6, 2006, the Japanese Minister of the Environment, Yuriko Koike, created a furoshiki cloth in an effort to promote its use across the modern world.
 
Here is a great visual guide from the The Japanese Ministry of the Environment  
showing how to wrap all sorts of gift items.

This holiday season, rather than wrapping your gifts in paper that gets torn and tossed after a single use, why not try furoshiki instead. Make your own cloths out of fabric, or use tea-towels or scarves that can be enjoyed by the gift recipient or reused at a later date. Let's make an effort this season to not only give to one another, but to also give back to the environment.  

Inside Out : Wheatgrass

9/29/11


For those of us that like to keep life simple, here is a modern, easy to create home décor suggestion. At a time of year, while we are saying goodbye to flowers and hello to naked trees, we can still count on our grass for a little while longer. Growing wheatgrass centerpieces in the home, or in outdoor planters, tops the cheap and cheerful list of ways to bring back some much needed life into the fall and winter seasons. 

Easy to follow instructions to grow your own:
  • Purchase wheat seeds from a nursery or health food store. 
  • Soak the seeds in a jar or container of water between 8 to 12 hours before planting.
  • Mix a little peat moss with planting soil in a ratio 1 part to 3 and place two inches deep in your selected tray or pot. Ensure your container has proper drainage holes or place rocks on the bottom.
  • Water the soil then spread the wheat grass seeds evenly across the top.
  • Cover the seeds lightly with peat moss and water using a spray bottle. Soak the soil in the morning and lightly spray in the evening for three days, then continue as needed.
  • Place the wheatgrass away from direct sunlight for up to 10 days and begin to watch it grow.
  • Cut the grass with scissors to your desired height and shape.
Did you know that wheatgrass clippings contain vitamins A, C, E and B complex? Chewing on and juicing the grass ranks high with health nuts. Pets also love to chomp on wheat grass, so you may wish to plan ahead where your pot(s) will be placed.

OOMPHLOVE All rights reserved © Blog Milk Powered by Blogger